Introduction
Welcome to Conductor, Link Labs' cloud-based data-services platform. Conductor exposes RESTful application program interfaces (APIs), which give account holders a simple interface to access their Symphony Link networks. The APIs make it easy to build web-based applications to monitor and control machine-to-machine (M2M) and internet-of-things (IoT) networks.
What is Conductor?
Conductor is a suite of cloud-based services with the purposes of managing the configuration of and data used by Symphony Link networks. The Conductor system is currently deployed inside Amazon Web Services ("the cloud"), though it could in principle be deployed in any server farm. The system has been developed using a multitude of tools, including:
- Java
- Spring Security
- Spring MVC
- Tomcat7
- Swagger (API documentation @ http://docs.conductor.link-labs.com)
- Mysql
Conductor contains several components, depicted in the following picture.
Components of Conductor

From the user's perspective, the most important component of Conductor is the ClientEdge. ClientEdge exposes an API to read data collected by a Symphony Link network and send data to Symphony Link modules. The components of Conductor perform the following jobs:
- Access -- Manages the permissions and accounts of users of Symphony Link networks.
- NetworkAsset -- Manages the groupings of entities (gateways, repeaters, modules) within Symphony Link networks. For example, NetworkAsset keeps track of which gateways are assigned to participate in a given Symphony Link network, and which modules can communicate with those gateways.
- NetworkEdge -- The entry point from a gateway to Conductor. NetworkEdge manages registration of new gateways and modules, manages uplink data flowing up from gateways, and manages downlink data flowing down to modules.
- DataBroker -- Manages dataflows within Conductor, and manages long-term storage and short-term caching of data.
- DataConsumer -- Manages data subscriptions.
- ClientEdge -- Provides an API to interact with Symphony Link networks. ClientEdge is used to query data collected by Symphony Link networks, create/issue commands to specific modules, and request subscriptions to monitor real-time dataflow.
How does Conductor talk to a Gateway?
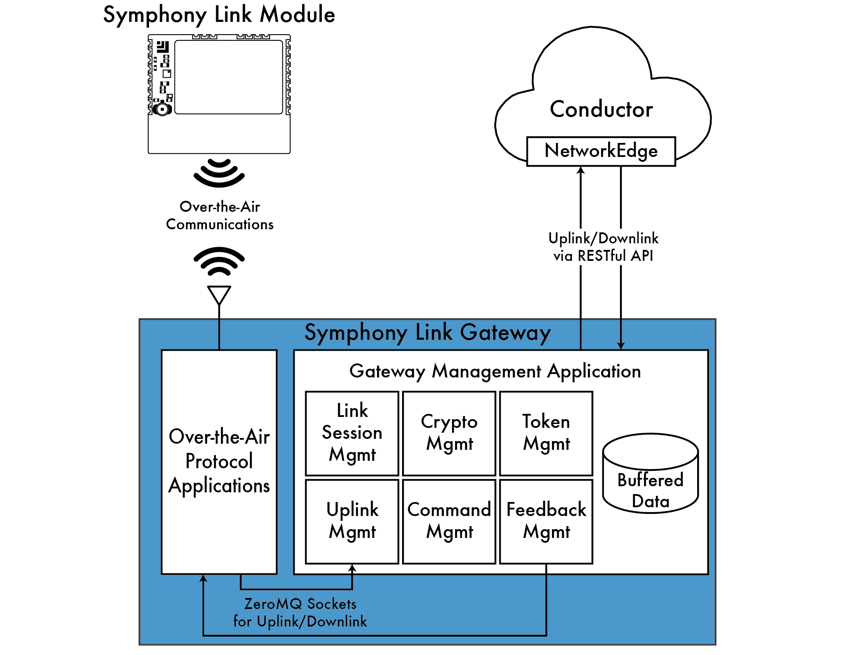
The connection between a Symphony Link gateway and Conductor is made between the Gateway Management Applications (which runs locally on the gateway) and the NetworkEdge (which runs in Conductor). The gateway uses the NetworkEdge RESTful API to send uplink data and to poll for downlink data.
Dataflow inside Conductor

The dataflow within Conductor is pictured above. Users can implement the ClientEdge API to query/send data or to establish a subscription for "real-time" data exchange. Conductor uses Apache Kafka to broker publish-subscribe messaging.
Users and Credentials
User Creation
A new Conductor User can create an account via Conductor's web-based user interface (UI) at conductor.link-labs.com.
While creating a new account, the user will be prompted to enter an email address and Device ID. The Device ID is the MAC Address for Symphony Link devices and the IMEI for LTE Cat-M1 devices. Follow the instructions on the screen and in your email to complete your registration.
Non-Enterprise Plan users are required to choose a plan and enter billing information to complete the registration process. Enterprise Plan users should contact sales@link-labs.com to complete their registration.
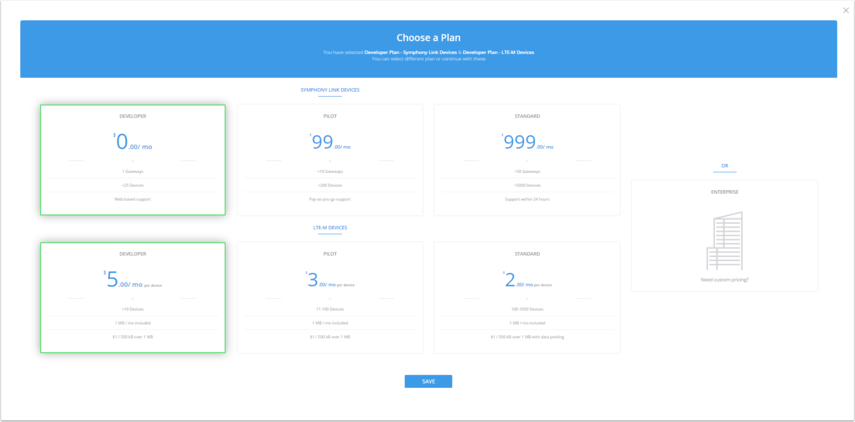
User Management
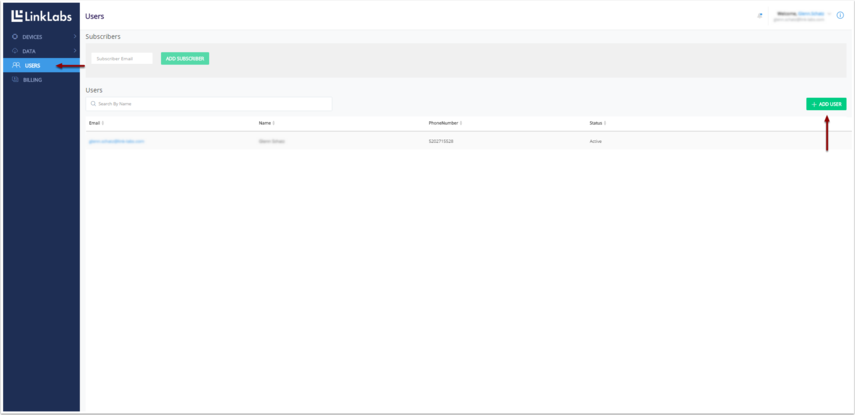
A User is registered and a plan is selected, the User is assigned to a UserGroup, which associates the user with an account. Authorities are granted to UserGroups, which allow the User to perform actions within the system. Other Users can be added via the User tab on the lrft ribbon and by clicking "Add User" in the upper right hand corner.
See the Access article for more information on the Conductor Security Domain Model.
Access
This article explains the Security Domain Model used to control access to and within Conductor accounts.
Users
A User is an entity that can use a Conductor Account. A User is granted certain Authorities. Authorities determine the actions the User can perform, the data the User can view, and the assets the User can control.
Account
An Account defines the domain of security, assets, and data for a group of Users. Every Account is unique and has at least one User, usually the individual/entity who created the Account. New Users may be added to an existing Account by an existing User of the Account (assuming that User holds the proper granted Authorities to add new Users).
UserGroup
UserGroups are used to map Users to Policies. A User that is a member of a UserGroup is granted all the Authorities defined by the Policies associated with the UserGroup.
A special type of UserGroup is created for each Account, which denotes the owners of that Account. No Policy is needed for this type of UserGroup. Members of the owners UserGroup are granted all available Authorities for the Account.
Policy
A Policy is a set of Authorities. Policies are associated to a UserGroup to assign Users a set of Authorities.
Authorities
An Authority is an Operation-Resource pair that defines whether an Operation can be performed on a Resource. Authorities are added to a Policy to grant permissions to Users. Examples include CREATE_User, READ_uplinkPayloadData.
Resources
A Resource is an entity available within Conductor. Resources are defined in order to group certain functions and to allow for those functions to be permitted via Authorities. Examples of Access Model Resources are Users, Accounts, and Policies. Examples of Data Model Resources are uplinkPayloadData, and avgSignalMetadata.
Operations
An Operation is an action that can be executed on a Resource. Examples are CRUD operations (create, read, update, delete). an Operation-Resource pair forms an Authority.
NetworkAssets
This article explains how Network Assets are separated into distinct groups by Conductor. Conductor identifies groups of modules and groups of gateways using a token scheme. The system relies on two types of tokens: Application Tokens and Network Tokens. Further separation of Nodes can be achieved using AssetGroups. These concepts are discussed in this section.
Modules
A module is associated with one Application Token, which is assigned to it by its user. Users can generate Application Tokens within their Conductor accounts by using the Conductor UI. Application Tokens can also be generated via the REST API by users with proper granted authorities.
Before a module can communicate with a Conductor account, it must register with the account by informing Conductor of its Application Token. This registration process only needs to occur at the beginning of the module’s life, but may occur as frequently as desired. Registration of the module is executed by transmitting the Application Token over the air using the ll_config_set function of the ll_ifc_symphony library. For more information, refer to the applicable Symphony Link Module user guide.
Gateways
Every gateway is registered to one Conductor account and is associated with one Network Token. Initial registration of a gateway is completed locally at the Gateway Admin Webpage (the gateway’s local webpage), which is pictured below. Once a gateway is registered to an account, a user with proper granted authorities may change the Network Token associated with the gateway using the Conductor UI.
For more information regarding initial registration of a gateway, refer to the applicable Symphony Link Gateway user guide.
Application Tokens
An Application Token is an 80-bit unique identifier, used to identify a class of modules. Application Tokens provide users a method to segregate data-flows logically. The intent is for all modules doing the same type of job -- for example, reporting water flow-rate data -- to use the same Application Token.
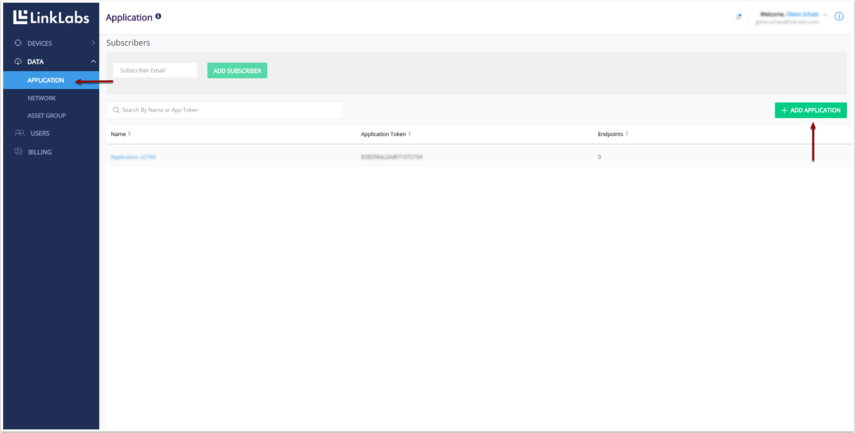
Application Tokens are generated by users within a Conductor account. Navigate to the Application tab on the left ribbon then click the "Add Application" button in the upper right hand corner. Modules use the Application Token to register with the account (see the Modules section, above).
Network Tokens
A Network Token is a 32-bit unique identifier, used to separate distinct Symphony Link networks. With the exception of the OPEN Network Token (which is the default assigned to all factory-fresh gateways and modules), Network Tokens are generated within a Conductor account using the Conductor UI.
All modules and gateways advertize a Network Token. A module and a gateway can communicate only if they both advertize the same Network Token. The one exception to this rule is that any module can communicate with a gateway that advertizes the OPEN Network Token.
The Network Token assigned to a gateway can be changed using the Conductor UI or by using the Client Edge API. The Network Token assigned to a module is changed by using the ll_config_set function of the ll_ifc_symphony library. For more information, refer to the applicable Symphony Link Module user guide.
To create an Network Token using the Conductor UI
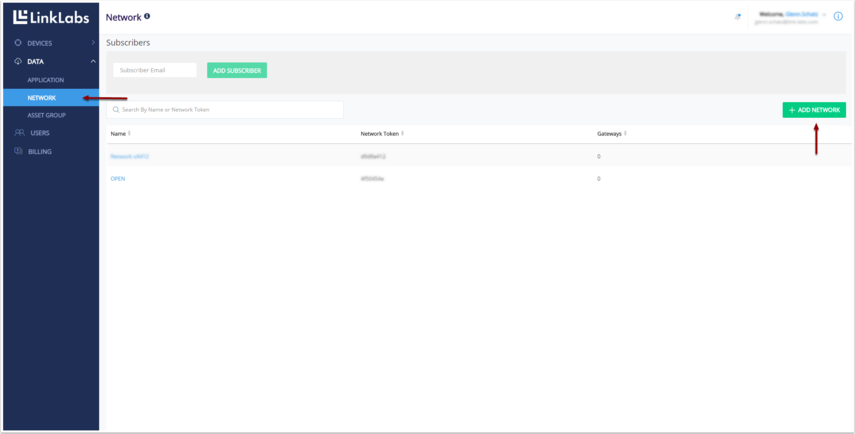
Navigate to the Network tab on the left ribbon then click the "Add Network" button in the upper right hand corner. Add a Network name and select the devices that belong to this AssetGroup.
AssetGroups
An AssetGroup is a logical grouping of Network Assets. AssetGroups provide a method to separate data-flows beyond the capabilities afforded by Network and Application Tokens.
Consider the following example. An account-holder owns 10 modules, which are all being used to report water flow-rate data. He therefore assigns the same “flow meter” Application Token to all 10 modules. However, 5 of the modules are physically located at one facility (call it Facility A) and the remainder are located at another (Facility B). He might therefore want to place the Facility A modules in one AssetGroup and the Facility B modules in another, to separate the two data flows, even though all 10 modules share the same Application Token.
To create an AssetGroup using the Conductor UI
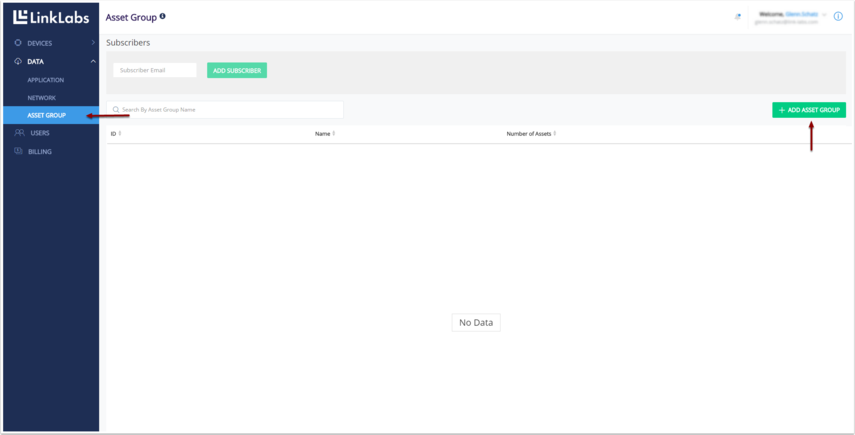
Navigate to the Asset tab on the left ribbon then click the "Add AssetGroup" button in the upper right corner. Add an AssetGroup name and select the devices that belong to this AssetGroup.
To create an AssetGroup using the Conductor API
POST <NetworkAssetBase>/assetGroups
body application/json:
{
  "account": {
    "desc": "",
    "href": "SecurityAccessBase/account/{}accountId}"
  },
  "assetGroupName": "FriendlyName}"
}
To query the AssetGroups owned by an Account
GET <NetworkAssetBase>/assetGroups?accountid={accountId}To add/remove a Node to/from an AssetGroup
PATCH/DELETE <NetworkAssetBase>/assetGroup/{assetGroupId}/nodes
body application/json:
{
  "href": "<NetworkAssetBase>/module/{module_nodeAddress}",
  "desc": ""
}
To query all members of an AssetGroup
GET <NetworkAssetBase>/assetGroup/{assetGroupId}Alerts and Notifications
Creating and using Alerts
This feature allows a user to set conditions tha alert the user via e-mail or SMS when triggered by an action. Alerts may be set for any type of device.
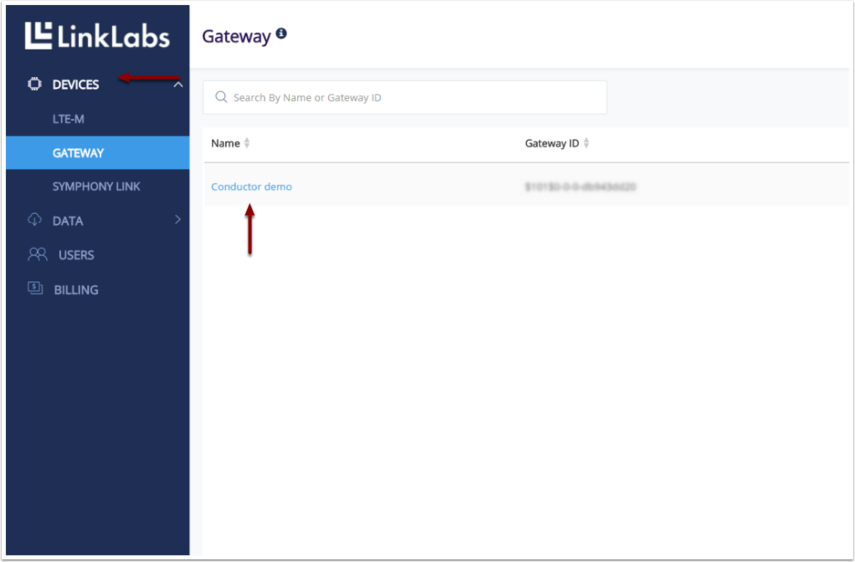
The Alert Rule button is in the upper right hand corner.
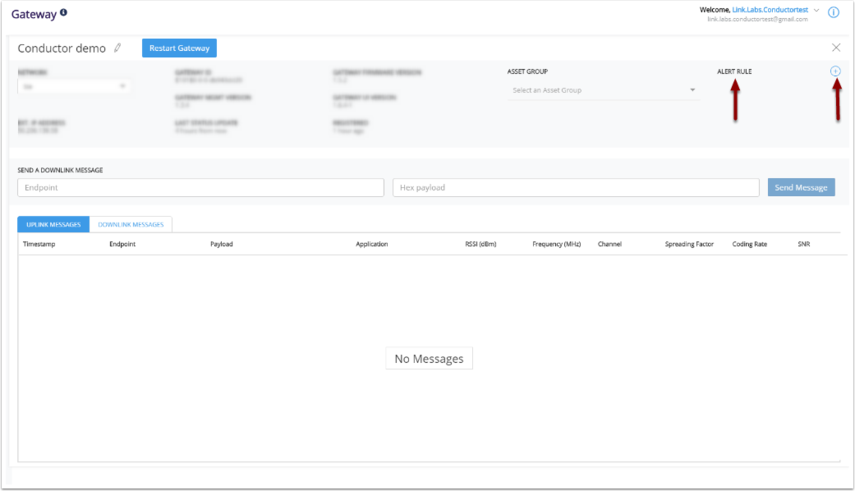

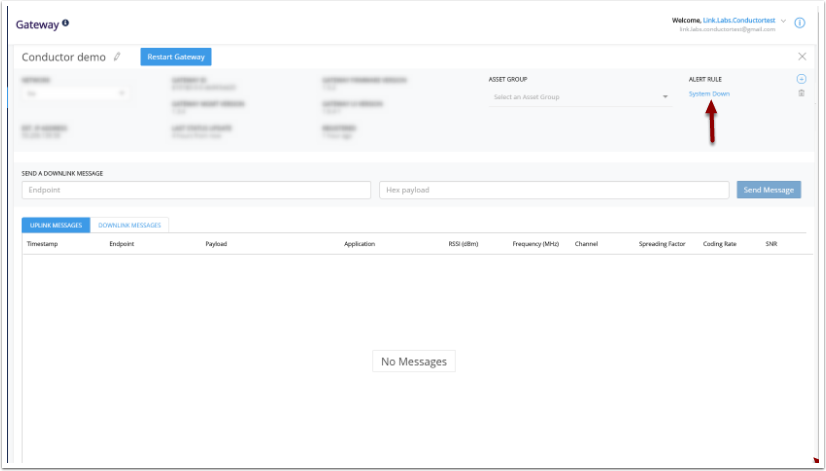
Name the Alert and choose a notification option. It is possible to alert multiple email and phone numbers.

The alert should be visible on the device screen.
Authentication
Authentication is the act of providing credentials along with a request to Conductor. Conductor then determines whether the request is authorized. In general, requests made with invalid credentials are considered "unauthorized" by Conductor, and result in an HTTP response code of 401.
If Conductor determines a request has been made with valid credentials, but that the authorities associated with those credentials are inadequate for the request in question, then the request is considered forbidden and results in an HTTP response code of 403.
To make an authenticated request, a client must make a request to conductor and provide credentials and authorizing information with the request.
- If Conductor determines the credentials are valid and the provided authorities are adequate, a 2xx response code is returned. The calling client may handle the response accordingly.
- Else if Conductor determines the credentials are valid but authorities are inadequate, a 403 response code is returned.
- Else Conductor determines the credentials are invalid and a 401 response code is returned.
The following sections describe the mechanisms supported by Conductor to provide authentication of requests.
BasicAuth
BasicAuth facilitates authorization of Conductor requests within the scope of a single Conductor API (Conductor uses many APIs). To implement BasicAuth, use the following steps:
- Populate the HTTP request header with:
Authorization: Basic <credentials>- If validly authenticated, the HTTP response headers may contain a Set-Cookie with a JSESSIONID, which may then be used in lieu of the Authorization request header on subsequent requests during the lifetime of the session. Use of the JSESSIONID obviates the need for re-authentication during the lifetime of the session.
The value of <credentials> used in the HTTP request header is specific to a particular username-password pair. Calculate <credentials> using the following procedure:
- Concatenate a valid username-password pair with a colon separator.
- Obtain the ASCII bytes of the <username>:<password> concatentation.
- Apply Base64 encoding to the ASCII bytes.
For example, the BasicAuth <credentials> for the username-password pair <myname>:<mypass> becomes the following after encoding in Base64:
<myname>:<mypass> = bXluYW1lOm15cGFzcw==OAuth2
OAuth2 facilitates authorization of Conductor requests within the scope of the entire suite of Conductor APIs. It therefore acts as a "single sign on" service for Conductor.
In general, OAuth2 consists of a client providing credentials to an Authorization Server. Upon validation of the credentials, the Authorization Server responds with a valid Access Token. Optionally, the response may include a Refresh Token, which may be used to obtain another Access Token once the previous one has expired. Once obtained, the client provides the Access Token with each request to a secured Resource Server. A Resource Server will authenticate a new request as long as the provided Access Token is valid and unexpired. Each member of the suite of Conductor APIs is a Resource Server within the context of OAuth2.
OAuth2 is implemented using the following procedure:
- Provide username-password and client credentials to the Conductor Authorization Server via a request of the following form:
POST: https://oauth2-conductor.link-labs.com/oauth/token
Content-Type: application/x-www-form-urlencoded
Request Body:
grant_type=password&username={user}&password={pass}&client_id={id}&client_secret={secret}- A valid request yields a JSON response containing an Access Token and a Refresh Token:
Response Body:
{
  "access_token":"0bff3b89-1570-4470-a498-7b3cfbf0b971",
  "token_type":"bearer",
  "refresh_token":"f41fc298-c829-4a2a-998b-fa7e2fe30636",
  "expires_in":86399,
  "scope":"all"
}- To authenticate requests to Conductor APIs (a Resource Server), provide a valid Access Token using a request header:
Authorization: Bearer <accessToken>For example:
Authorization: Bearer 0bff3b89-1570-4470-a498-7b3cfbf0b971- If a request fails and Conductor returns an Unauthorized 401 response, a new Access Token may be obtained by making a refresh request to the Conductor Authorization Server. The refresh request uses the Refresh Token provided in the initial response from the Authorization Server:
POST: https://oauth2-conductor.link-labs.com/oauth/token
Content-Type: application/x-www-form-urlencoded
Request Body:
grant_type=refresh_token&refresh_token={refresh_token}
&client_id={id}&client_secret={secret}
For example:
grant_type=refresh_token&refresh_token={f41fc298-c829-4a2a-998b-fa7e2fe30636}
&client_id={id}&client_secret={secret}- A successful refresh request results in the same JSON response shown in Step 2, above.
- If it necessary to revoke an active Access Token prior to its expiration time (analogous to a "logout" operation of a session-based authentication scheme), a revocation request may be made using the Access Token to be revoked:
POST: https://oauth2-conductor.link-labs.com/oauth2/revoke
Authorization: Bearer <accessToken>
For example:
Authorization: Bearer 0bff3b89-1570-4470-a498-7b3cfbf0b971Address Model
An Address is the unique identity associated with every Node (i.e., modules, gateways and repeaters) within Conductor. An Address may also refer to the unique identity of a specific Link between a pair of Nodes.
Addresses are:
- used to identify data items retrieved from Conductor.
- provided to Conductor for the purpose of querying/filtering operations.
- provided to Conductor to specify the target of a downlink operation (e.g. sending a command to a module).
Node Types
Node Types are 16-bit big endian integers, which are hard-coded into Conductor and used identify various types of nodes. Conductor currently supports the following Node Types:
|
Hex Value |
Type |
Subtype |
|
0x0101 |
Gateway |
Symphony Link |
|
0x01FF |
Gateway |
Virtual-iOSApp |
|
0x01FE |
Gateway |
Virtual-AndroidApp |
|
0x0201 |
Repeater |
Symphony Link |
|
0x0301 |
Module |
Symphony Link |
|
0x0302 |
Module |
LoRaWAN |
Node Type formatting
Node Types are formatted as text via the following pattern:
$NNNN$where NNNN represents the hex value of the given Node Type, with most significant zeros optionally removed for conciseness. For example,
$301$is a valid text representation for a Symphony Link Module.
Node IDs
A Node ID uniquely identifies a specific Node within the scope of the Node Type.
The maximum supported size of a Node ID is a 128-bit big endian integer. In practice, the size of the Node ID is defined by the applicable Node Type, as detailed in the following table.
|
Node Category |
Subtype |
ID Size |
ID Source |
|
Gateway |
Symphony Link |
48 bits |
eth0 MAC address |
|
Gateway |
Virtual-iOSApp |
128 bits |
app installation |
|
Gateway |
Virtual-AndroidApp |
128 bits |
app installation |
|
Repeater |
Symphony Link |
36 bits |
manufacturing |
|
Module |
Symphony Link |
36 bits |
manufacturing |
|
Module |
LoRaWAN |
64 bits |
manufacturing |
Node ID formatting
Node IDs are formatted as text via the following quad pattern:
XXXXXXXX-XXXXXXXX-XXXXXXX-XXXXXXXXX (32-32-28-36 bits)where the Xs represent a hex character. The most significant zeros within a quad may optionally be omitted for compactness. Examples include the following:
|
ID (Hex) |
Description |
Text Formatted |
|
0x12FACE007 |
36-bit ID |
0-0-0-12FACE007 |
|
0xAABBCCDDEEFF |
48-bit ID |
0-0-AAB-BCCDDEEFF |
|
0x1122334455667788 |
64-bit ID |
0-0-1122334-455667788 |
|
0x1122334455667788 99AABBCCDDEEFF11 |
128-bit ID |
11223344-55667788- 99AABBC-CDDEEFF11 |
Node Addresses
A Node Address is a globally unique address, which consists of a Node Type and a Node ID, together.
Node Address formatting
Node Addresses are formatted as text via the following pattern, which is simply a concatenation of the Node Type and Node ID formatting pattern:
$NNNN$XXXXXXXX-XXXXXXXX-XXXXXXX-XXXXXXXXXwhere
- NNNN represents the hex value of the given Node Type, with most significant zeros optionally removed.
- Xs represent a hex character, with most significant zeros within a quad optionally compacted to a single zero.
For example,
$301$0-0-0-12FACE007is a valid text representation for a Symphony Link Module whose ID is 0x12FACE007.
Link Types
A Link Type is a 16-bit big endian integer used to identify the type of link between two Nodes.
Conductor currently supports the following Link Types:
|
Hex Value |
Type |
Subtype |
|
0x0101 |
OTA |
Symphony Link |
|
0x0102 |
OTA |
Semtech LoRaMAC |
|
0x0103 |
OTA |
BLE |
|
0x0201 |
Internet |
HTTP GET |
|
0x0202 |
Internet |
HTTP POST |
|
0x0203 |
Internet |
WebSocket |
|
0x0FFD |
Gateway |
Gateway Mgmt App |
|
0x0FFE |
Gateway |
Customer Socket |
Link Type formatting
Link Types are formatted as text via the following pattern:
!LLLL!where LLLL represents the hex value of the given Link Type, with most significant zeros optionally removed. For example,
!101!is a valid text representation for a Symphony LoRa Link.
Link Addresses
A Link Address represents a Link between a pair of Nodes over a Link of a particular type. A Link Address therefore contains the Node Addresses and the Link Type.
The order of the Node Addresses within a Link Address is important. The Node farthest from Conductor is listed first in the Link Address. For example, in the Link Address of a Link between a Symphony Link Module and a Symphony Link Gateway, the Node Address of the module is listed first and the Node Address of the gateway is listed last.
Link Address formatting
A Link Address is formed by concatenating the far Node Address, the Link Type, and the near Node Address:
<FarNode><LinkType><NearNode>
$NNNN$X-X-X-X!LLLL!$NNNN$X-X-X-X
where
- NNNN represents the hex value of the each Node Type, with most significant zeros optionally removed.
- Ns represent a hex character, with most significant zeros within a quad optionally compacted to a single zero.
For example,
$301$0-0-0-12FACE007!101!$101$0-0-AAB-BCCDDEEFFis a valid text representation for a Symphony Link Module (whose ID is 0x12FACE007) linked via an over-the-air Symphony Link to a Symphony Link Gateway (whose ID is 0xAABBCCDDEEFF.
Client Edge APIs
The Client Edge APIs allow clients to access Uplink data from and send Downlink data to Network Assets. Additionally, the Client Edge APIs expose the set of Network Assets which are valid Subjects of Uplink and Downlink operations for the given client.
Additional Swagger documentation of the Client Edge APIs is maintained at https://clientedge-conductor.link-labs.com/clientEdge/docs.html.
Client Edge Data API
The Client Edge Data API allows clients to access data from Nodes (i.e., modules, repeaters and gateways) to which they have access given their granted authorities.
In general, the Client Edge Data API is organized by:
- the data type’s handled by Conductor,.
- the subject type’s supported by Conductor,.
- and specific subject id’s which are registered with Conductor. Here, the term subject refers to the subject of a data query or subscription (the item or items whose data is to be accessed).
Additionally, individual data events of every supported data type are exposed via their own unique URLs. Each of these URLs includes the data type as well as the unique UUID-EventTime pair of the given event.
Endpoints which comprise the Client Edge Data API take one of the following forms:
<ClientEdgeBase>/data/<dataType>/<subjectType>/<subjectId>which is referred to using the shorthand <DataSubjectURL>, and
<ClientEdgeBase>/data/<dataType>/event/<UUID>/<eventTime>which is referred to as <DataEventURL> for short.
The following definitions apply:
- DataType -- The type/schema/format/content of the data item. See the Supported Data Types table, below.
- SubjectType -- The Subject of the query: the abstract or concrete thing being queried, which defines the scope of the query. See the Supported Subject Types table, below.
- SubjectId -- The unique ID of the Subject of the query. The format of this ID is a function of the SubjectType. See the Supported Subject Types table, below.
- UUID -- The unique 128-bit ID of a data event.
- eventTime -- The millisecond-precision timestamp of the event, in ISO 8601 format.
|
Supported Data Types |
|
|
Data Type |
Description |
|
uplinkPayload |
Overall payload message uplinked from a Node over the course of one or more over-the-air uplink packets. |
|
avgSignalMetadata |
Signal quality metrics of a message, averaged over each of the message’s over-the-air packets. |
|
gatewayStatus |
Periodic status report of a gateway. |
|
Supported Subject Types |
||
|
Subject Type |
Description |
Subject ID Format |
|
node |
Data is scoped to the specific Node. |
<nodeAddress> |
|
applicationToken |
Data is scoped to all modules associated with the Application Token. |
<80-bit Hex> |
|
networkToken |
Data is scoped to all gateways associated with the Network Token. |
<32-bit Hex> |
|
account |
Data is scoped to all Network Assets associated with the Account. |
<accountId> |
Client Edge Data Query API
The Client Edge Data Query API consists of several different Subject based query types, each of which is summarized in the Query Types table, below
|
Query Types |
||
|
Query Type |
Description |
URL Format |
|
Time Range |
Query the events from the given Subject after the floor time and before the ceiling time. |
<DataSubjectURL>/events/ <ceilingTime>/<floorTime> |
|
Most Recents |
Query the most recent events from the given Subject at the time of the request. |
<DataSubjectURL>/mostRecentEvents |
|
Search |
Query the events from the given Subject using search parameters. See the Search Parameters table below. |
<DataSubjectURL>/events?<searchParams> |
|
Search Parameters |
||
|
Parameter |
Description |
Format |
|
before |
Query the events from the given Subject whose timestamps are before the given time. |
?before=<ISO8601> |
|
after |
Query the events from the given Subject whose timestamps are after the given time. |
?after=<ISO8601> |
|
f.<property> |
Query the events from the given Subject whose given property evaluates positively with respect to the given operation and reference value. See the Filter Operations table, below. |
?f.<property>=<operation>.<refValue> |
|
Filter Operations |
|
|
Parameter |
Description |
|
EQ |
Evaluates positively if the associated event’s property is equal to the given reference value. |
|
NEQ |
Evaluates positively if the associated event’s property is not equal to the given reference value. |
Paging results
Client Edge will send back data in chunks for each request. If a request has more results that exist for the requested time range, 2 flags will be set in the returned result set -- moreRecordsExist and nextPageId. If the moreRecordsExist flag is true, the nextPageId property will be populated with an Id to pass in for the next query, to get the next set of results as a query parameter of pageId.
Example:
Query 1: GET <clientEdgeBase>/clientEdge/data/uplinkPayload/applicationToken/1234567890abcdef1234/events/2016-10-20T15:51:26.213/2016-10-15T15:50:26.213
Returns:
{
queryUrl: {
href: "/clientEdge/data/uplinkPayload/applicationToken/1234567890abcdef1234/events/2016-10-20T15:51:26.213/2016-10-15T15:50:26.213"
},
subjectType: "applicationToken",
subject: "1234567890abcdef1234",
queryTime: "2016-10-20T16:59:27Z",
maxWTime: "2016-10-20T15:51:22.975",
minWTime: "2016-10-20T15:02:30.933",
resultCount: 1605,
moreRecordsExist: true,
nextPageId: "2cc3aab3-d694-4dd2-9385-9e73244b4228",
results: [ {<events here>} ]
}
Query 2: GET <clientEdgeBase>/clientEdge/data/uplinkPayload/applicationToken/1234567890abcdef1234/events/2016-10-20T15:51:26.213/2016-10-15T15:50:26.213?pageId=2cc3aab3-d694-4dd2-9385-9e73244b4228
Returns:
{
queryUrl: {
href: "/clientEdge/data/uplinkPayload/applicationToken/1234567890abcdef1234/events/2016-10-20T15:51:26.213/2016-10-15T15:50:26.213"
},
subjectType: "applicationToken",
subject: "1234567890abcdef1234",
queryTime: "2016-10-20T16:59:35Z",
maxWTime: "2016-10-20T15:02:22.975",
minWTime: "2016-10-16T14:02:30.933",
resultCount: 564,
moreRecordsExist: false,
results: [ {<events here>} ]
}
Example Queries
Query UplinkPayload events from a given Node which occur within a given Time Range:
GET: <ClientEdgeBase>/data/uplinkPayload/node/$301$0-0-0-35426be41/events/2015-09-02T00:00:00/2015-09-01T00:00:00Query the MostRecent AvgSignalMetadata events associated with a given Application Token:
GET: <ClientEdgeBase>/data/avgSignalMetadata/applicationToken/0123456789ABCDEF0123/mostRecentEventsQuery the GatewayStatus events associated with a given Network Token which occur before a ceiling time, after a floor time, and whose level property equals the value “Error”:
GET: <ClientEdgeBase>/data/gatewayStatus/networkToken/01234567/events?before=2015-09-01T01:00:00&after=2015-09-01T00:00:00&f.level=EQ.ErrorClient Edge Command API
The Client Edge Command API allows clients to send Commands to Nodes.
There are two major sub-components of the Command API:
- Commands -- where clients define the intrinsic state of a given Command.
- Issued Commands -- where a given Command is issued to its target Node(s) and its status is made available for monitoring.
Commands
Interaction with the Commands sub-component of the Command API takes the following form:
- Define the desired binary payload of the Command.
- Optionally, define the communication requirements of the Command.
- Present the payload and optional communication requirements to the Command API in the form of a set of CommandProperties in order to obtain a handle to a unique Command object for the given CommandProperties.
Once a unique Command object has been defined, this same Command may be issued repeatedly to various target Nodes if desired.
The specific Command Definition API request is:
POST: <ClientEdgeBase>/commands
Request: CommandProperties
Response: Command
A CommandProperties object is defined as:
{
    "payloadHex": "0123456789ABCDEF",
    "commReqs": {
      "requiredAckRatio": 1.0,
      "requiredSuccessfulAckRatio": 1.0,
      "priority": 1,
      "ttlMSecs": 60000
    }
}
The fields of the CommandProperties object have the following meanings:
- payloadHex (required) -- The hexadecimal representation of the desired binary payload.
- requiredAckRatio(required) -- The required ratio of any type of acknowledgements (i.e. either success or failure) from the targeted Nodes in order to consider the issuance of the given Command to be a success.
- requiredSuccessfulAckRatio (required) -- The required ratio of successful acknowledgement from the targeted Nodes in order to consider the issuance of the given Command to be a success.
- priority (required) -- The priority level of the Command (greater values indicating greater priority) to be considered during the propagation of the Command to its targeted Nodes.
- ttlMSecs (required) -- The Time to Live expiration of the Command, in milliseconds from time of issuance, for which acknowledgements from targeted Nodes will be accepted and considered as part of the overall success of the issuance of the given Command.
A Command object is defined as:
{
  "self": {"href": "<ClientEdgeBase>/command/<commandId>"},
  "commandId": "<id>",
  "commandProperties": {..}
}
The fields of a Command object have the following meanings:
- commandId -- The system-assigned unique ID of the command defined by the given CommandProperties.
- commandProperties -- The intrinsic CommandProperties which define the Command
Issued Commands
Interaction with the Issued Commands sub-component of the Command API takes the following form:
- Obtain a handle on the Command which is to be issued (See the Commands section, above)
- Define the desired target Nodes of the given Command, either by:
- specifying the Node addresses to be targeted, requiring that Conductor look for recent activity related to the targeted Nodes (Targeted Node style).
- specifying the explicit Link address over which to route the Command (Routed style).
- defining the Command in the same step as targeting Nodes or specifying Links (Combined style).
- Issue the Command and obtain a handle on the status monitoring URL for the given Issued Command.
- Monitor the status of Issued Command as desired until it is considered to be a Success or Failure given the associated communication requirements.
The specific Command Issuance API request is:
Targeted Node Style
POST: <ClientEdgeBase>/issuedCommands/<commandId>?since=<ISO8601>
Request: JSON array of Node Addresses to Target ["","",...""]
Response: IssuedCommand
Routed Style
POST: <ClientEdgeBase>/issuedCommands/routed/<commandId>
Request: JSON array of Link Addresses to Route over ["","",...""]
Response: IssuedCommandCombined Style
POST: <ClientEdgeBase>/issueCommand
Request: CommandIssuanceInfo
Response: IssuedCommandIn the above, a CommandIssuanceInfo object is defined as:
{
  "commandProperties": {...}
  },
  "commandTargets": {
    "targetNodeAddresses": ["","",...""],
    "routesSinceTime": "<ISO8601>"
  },
  "commandRoutes": {
    "linkAddresses": ["","",...""]
  }
}
The fields of the CommandIssuanceInfo object have the following meanings:
- commandProperties (required) -- The intrinsic CommandProperties which define the Command.
- targetNodeAddresses (optional) -- JSON array of Node Addresses to Target.
- routesSinceTime (optional) -- The time after which recent activity for the given Node Addresses should be considered when determining the set of Links to over which to Route.
- linkAddresses (optional) -- JSON array of Link Addresses over which to Route.
NOTE: Either commandTargets or commandRoutes is optional, but not both.
In the above, an IssuedCommand object is defined as:
{
  "self": {"href": "<ClientEdgeBase>/issuedCommand/<issuanceId>"},
  "issuanceId": "<id>",
  "issuanceTime": "<ISO8601>",
  "commandRel": {"href": "<ClientEdgeBase>/command/<commandId>"},
  "downlinkStatusRel": {"href": "<ClientEdgeBase>/issuedCommand/<issuanceId>/status"},
  "routeAssignments": [
    {
      "targetNode": "<nodeAddress>",
      "assignedLink": "<linkAddress>"
    }
  ],
  "downlinkStatusDetailRels": [
    {"href": "<ClientEdgeBase>/issuedCommand/<issuanceId>/statusDetail/<linkAddress>"}
  ]
}
Issued Command Status
The Issued Command Status endpoint allows clients to monitor the status of a previously issued command that is still being tracked by Conductor.
The specific Issued Command Status API request is:
GET: <ClientEdgeBase>/issuedCommand/<issuanceId>/status
Request: N/A
Response: DownlinkStatus
In the above, the DownlinkStatus object is defined as:
{
  "self": {"href": "<ClientEdgeBase>/issuedCommand/<issuanceId>/status"},
  "downlinkItemRel": {"href": "<ClientEdgeBase>/issuedCommand/<issuanceId>"},
  "statusTime": "<ISO8601>",
  "status": "",
  "statusInfo": ""
}
The fields of the DownlinkStatus object have the following meanings:
- statusTime -- The applicable time for the given status of the given Issued Command.
- status -- The status value. Valid values related to the status of the given Issued Command are:
- Pending -- Has not yet expired and has not yet met its acknowledgement requirements.
- Expired -- Has not met its acknowledgement requirements within the Time to Live expiration of the Command given its issuance time.
- Failed -- Has either not been able to be propagated to its intended targets or the intended targets have not accepted it.
- AcknowledgedSuccessful -- Has met its successful acknowledgement requirements.
- Successful -- Has met its acknowledgement requirements of any type.
- statusInfo (optional) -- Depending upon the status value, may contain additional info pertaining to how the given status value was achieved.
Issued Command Status Details
The Issued Command Status Details endpoint allows clients to monitor the status of a specific route of a previously issued command that is still being tracked by Conductor. These details are presented as history-of-propagation events for the specific route.
The specific Issued Command Status Details API request is:
GET: <ClientEdgeBase>/issuedCommand/<issuanceId>/statusDetail/<linkAddress>
Request: N/A
Response: DownlinkStatusDetail
In the above, a DownlinkStatusDetail object is defined as:
{
  "self": {"href": "<ClientEdgeBase>/issuedCommand/<issuanceId>/statusDetail/<linkAddress>
"},
  "associatedDownlinkItemRel": {"href": "<ClientEdgeBase>/issuedCommand/<issuanceId>"},
  "routeAssignment": {
      "targetNode": "<nodeAddress>",
      "assignedLink": "<linkAddress>"
    },
  "downlinkEvents": [
    {
      "stateTime": "<ISO8601>",
      "state": "",
      "payload": ""
    }
  ]
}
The fields of the DownlinkStatus have the following meaning:
- stateTime -- The applicable time for the given state of the propagation of the Issued Command on the given route.
- state -- The state value. Valid values related to the state of the given Issued Command on the given route are:
- Issued -- Has not yet been submitted to the gateway.
- Submitting -- Is being submitted to the gateway.
- Submitted -- Has been successfully submitted to the gateway.
- SubmissionRejected -- Has been rejected by the gateway.
- Sending -- Gateway is sending to the intended target Node.
- Sent -- Gateway has successfully sent to the intended target Node.
- SendFailed -- Gateway has failed to send to the intended target Node.
- ReceivedRejected -- Received but rejected by the intended target Node.
- Acknowledged -- Received and accepted by the intended target Node.
- Expired -- Has not met its acknowledgement requirements within the Time to Live expiration of the Command given its issuance time.
- payload (optional) -- Depending upon the state value, may contain a payload associated with the reporting of the state back to Conductor.
Client Edge Subscription API
The Client Edge Subscription API allows clients to subscribe for event data and the data in near real-time as it is generated. Client Edge provides different types of subscriptions to meet the needs of the client. Subscriptions are created via the Subscription REST Api by posting to an endpoint. The body is an json formatted Subscription Request that will be specific to the subscription type. In the Subscription request, the ChannelRequest specifies how the client would like to receive data. This may be Websocket, tcp socket, ZeroMQ, HTTP post, etc. Available ChannelRequest types are listed below, and will be added to over time.
POST <ClientEdgeBase>/data/<dataType>/<subjectType>/<subjectId>/subscriptions
body: application/json
{
  "subscriptionProperties": {
    "priority": 0,
    "filterProperties": [
      {
        "name": "",
        "value": ""
      }
    ]
  },
  "channelRequest": {
    "type": "",
    "endpoint": "",
    "properties": [
      {
        "name": "",
        "value": ""
      }
    ]
  }
}
DataType, subjectType, and subjectId are the same available options as in the ClientEdge Data Query Api.
Websocket Subscription
A Websocket Subscription is a type of short lived, session-based subscription. This subscriptions type provides streaming data via the HTML 5 websockets standard. HTML 5 websockets are supported in the following browsers:
- IE 10+
- Firefox 11+
- Chrome 16+
- Safari 6+
- Opera 12.10+
To create a websocket subscription, the ChannelRequest would specify a type of WebSocket. This is a two-step process. The first step is to register the subscription. At this point, the request is authenticated to ensure the client has the proper permission for the subscription and subject. An authenticated client will get back a Subscription response (json), which will point to the websocket URL that a client must hit to open the websocket and begin streaming data.
For example, to subscribe to all data for a gateway, the request would be:
Request to register the subscription. Specify a channelRequest.type of Websocket. The other properties of ChannelRequest are not needed in this case.
POST <ClientEdgeBase>/data/uplinkPayload/node/$101$0-0-0-feed12345/subscriptions
body:  application/json
{
  "subscriptionProperties": {
    "filterProperties": [
    ]
  },
  "channelRequest": {
    "type": "Websocket"
  }
}
Response application/json. This response contains the websocketUrl url that a client can use to initiate a websocket call.
{
	"id":"a19b514d-7c55-4908-8866-5f800b41fc53",
	"time":"20160111T175135.951",
	"channels":[
		{
			"time":"20160111T175135.951",
			"type":"Websocket",		 		"endpoint":"wss://clientedge-conductor.link-labs.com/clientEdge/websocket/a19b514d-7c55-4908-8866-5f800b41fc53",
			"properties":null,
			"lifetimeEventCountActivity":null,
			"recentEventCountActivity":null
		}
	],
	"websocketUrl":{
		"href":"wss://clientedge-conductor.link-labs.com/clientEdge/websocket/a19b514d-7c55-4908-8866-5f800b41fc53",
		"desc":"websocket subscription for uplinkPayload/node/$101$0-0-0-feed12345"
	}
}
Available subscription types (with added notes about the specific implementation)
- Websocket
- channelRequest.type = "Websocket"
- two step process to get the websocket connected
- response contains websocketUrl
- ZeroMQ2
- wraps the event with data headers and information as to the type of event
- allows feedback to the client when the subscription is closed and why
- channelRequest.type = "ZeroMQ2"
- channelRequest.endpont = "tcp://xxxx"
- this is a 0MQ REP socket that is waiting for results
- single step process to get the subscription created
- Future Planned subscription types
- tcp - open a tcp socket and send to the user upon data event match
- HTTP Post - REST Post to client upon data event match
- Email - get notified via email for certain events
- Additional types as clients needs change
Websocket Authentication
If the connection to a websocket endpoint occurs in the context of a web browser, then the authentication is handled by the web browser. The credentials are the user’s Conductor username and password.
ZeroMQ Subscriptions
ZeroMQ subscriptions provide a way for a client to set up a ZeroMQ REQ/REP socket pair to stream events. The client should set up a ZeroMQ REP socket "server" to listen for events. When the server receives an event, it must send a Response json object back to acknowledge receipt of the event. If the acknowledgment is not received within 10 seconds, the ZeroMQ socket will be assumed to be dead and the subscription will be closed. It is recommended that the client send the response right away after receiving the event, and not after processing the event in order to ensure the channel stays alive.
The following list of types of events that may be sent:
- Required Response from ZeroMQ "server"
{
"requestId":"8ae5942c-38f2-4e62-ae1d-1eb40534b062",
"responseStatus":{"OK":null},
"service":"Subscription",
"method":"Subscription",
"responseData":null
}
- Normal event flow to client server
{
"subscriptionId" : "dc05dfe9-d21c-45c8-a56b-5d1656919011",
"messageType" : "SubscriptionEvent",
"headers" : null,
"event" : {
"uuid" : "1a2dba0f-3ce1-416b-bf73-49c37a7ccf2c",
"time" : "2016-04-11T18:25:40.941",
"metadata" : {
"tags" : [ ],
"props" : {
"acctId" : "1",
"app_tok" : "1234567890abcdef1234",
"net_tok" : "abcdabcd",
"t_ingest" : "1460399141296"
}
},
"type" : "uplinkPayload",
"value" : {
"module" : "$301$0-0-0-030002467",
"linkType" : "257-SymphonyLoRa",
"gateway" : "$101$0-0-0-db9360af8",
"linkAddress" : null,
"startReceiveTime" : "2016-04-11T18:25:40.941",
"messageSequence" : "1",
"avgSignalMetadata" : {
"sourceAddress" : "$301$0-0-0-abcdef123",
"destAddress" : "$101$0-0-0-123456789",
"linkType" : "257-SymphonyLoRa",
"rssi" : -135.1999969482422,
"snr" : -7.25,
"chipNumber" : 0,
"bandwidth" : 72,
"codingRate" : 1,
"sf" : 7,
"channelNumber" : 65,
"frequency" : 913250000,
"crcValid" : true
},
"pld" : "feedface"
}
}
}
- Subscription closed by user
{
"subscriptionId" : "dc05dfe9-d21c-45c8-a56b-5d1656919011",
"messageType" : "UnsubscribeRequest",
"headers" : {
"matchedEventCount" : 365,
"ClosedReason" : "Requested by user",
"publishedEventCount" : 365
},
"event" : null
}
- Subscription closed due to error
{
"subscriptionId" : "8ae5942c-38f2-4e62-ae1d-1eb40534b062",
"messageType" : "Error",
"headers" : {
"matchedEventCount" : 2,
"ClosedReason" : "No response from after sending event",
"publishedEventCount" : 1
},
"event" : null
}
Example JavaScript code to connect to a Websocket Subscription previously generated for Uplink Data
var socket = new WebSocket('wss://clientedge-conductor.link-labs.com/clientEdge/websocket/a19b514d-7c55-4908-8866-5f800b41fc53);
socket.onopen = function() {
    console.log('Socket has been opened!');
};
socket.onmessage = function(message) {
    console.log('Socket has received data: ' + message.data);
    $('#uplinkPayloadData').append(message.data + '<br />');
};
socket.onclose = function() {
    console.log('Socket has been closed!');
};
socket.onerror = function() {
    console.log('Socket has received an error!');
};
AWS MQTT Subscriptions
A subscription can be created to post new topic subscriptions to an AWS MQTT endpoint.
Steps:
- Create a thing on the AWS IOT console.
- Create security certificates and download those.
- Apply policy to the certificate so that certificate holder can push messages to MQTT topic.
- Download certificate.
- Use the following network asset api to add certificate and private key.
https://networkasset-conductor.link-labs.com/networkAsset/docs.html#!/clientcerts/registerClientCert
- It returns the keyId that will be used to subscribe to events.
- Use the subscription API’s on the client edge to subscribe to data.
https://clientedge-conductor.link-labs.com/clientEdge/data/uplinkPayload/applicationToken/<ApplicationToken>/subscriptions
Sample Requests :
- Register keys
URL - https://networkasset-conductor.link-labs.com/networkAsset/docs.html#!/clientcerts/registerClientCert
Request JSON -
{
"account": {
"href": "/foo/bar/account_id",
"desc": ""
},
"description":"testkeys3",
"rSAPrivateKey": "-----BEGIN RSA PRIVATE KEY-----\nMIIEpgIBAAKCAQEAzBDyJmYcJq7z3z0xc6Hx0pOCFzIljbsP+JoBv8dqhELqyRxx\nTb9F0OvSRKM8QC+3Kr7N3Q5vANKplEF6FG12mIpLavXGnuU8YsOe3EEM90S6hLF+\nZI8vnYGZt4P0StV7krNDcTqYq/Kz/15QZO1+sw4ibg4inyKiH82Zl4BVJAHrm5zP\nvjcH37JVt4A2AaxZX4ZufDVi6aYMI58+VlxD5lNqIrWA0mFmjngeJfXrEsPFT/hO\nXMaQnN5DPp2HFHF+8O2BT5d8QZdd1SyUpe4eu+f3hLILyQVXHyHTgltg3nuTfGPx\nsGl35DztXf84U2dZwLzsg1FpkGtHumO+/8BKdwIDAQABAoIBAQDJXdd1aMFSssVX\nfqzzq9RStNhkR0mjZ/nEmUQsmH1Vcir4tSZhT+N2252ruWBU/kDC33GJNxr2Nuq7\nrzjmO8UC9USikVCjrxU9aEe0lERVI+7hzbwpQtn7lM24t28zASJlipt8ehP5aQ+R\naOHwFiM2UTZMX4pueeB9fYaYZzycv7twm1qnSDtAPJfeVOrLNvlKIfSTp3GEc75u\neHHM+qtOuM8TXALO9/gh7n/0aAySTIvLk9GZC0JYj77UoN9mFD+6tcc/CU3O5nMC\nXU5nIAFsQNo8Ow/k3uF6bosyd6XFJdaSSZyNzPLoTQ/V+vEw429Mn5SF6/r2BSGD\n/gUYENxhAoGBAPolpY5wRS0qYy3doVQLCmnnD/H49btckJ3OA7A8z3ugmAjy6/Um\neetzOTrau75vgwSBaSvJEgdeMQOHw+iXvJSiDlSyqG8pyZSPPkYdJtBamEifHz4L\n4x2MbfH5DxBQtd91QR36J2lAu9hIxf+gUSedARMr+IBF3rXJ3yn1+/9PAoGBANDX\nR6gGzEsdFl+pv04EBXWjN+AAMEhhPdw3GXnLcBLesLE8aSl0reMtZaiPo5hHB6mV\n4csEpb3Oqj4nMfVLaIAAS9xSgr3bj715M22XaGK75988AeVrTqV+d2dS3VThnbkQ\nCsV+wMqmQm8EaZMZDoP4frNXTD2LkGlmQVRzMPhZAoGBAPBxzXBcBHKEou7Mca1K\nK4leXBpYF0QwlqXJCAyYd0u7M0iu0BZGFL04dVNYO0yy/XoQNpqq3JSOeoiNMMfb\nSp6II0RQssyfmy8cfVyB2vQ9kNGFek92t6mIeYo0v8EMA7Y2jBAXi1iFq8obMY8k\nd72fEhBunKAYCRouYD+CPebLAoGBAKt1dAFBw4yPzwSvar70kj7oyEECJqHmJFGe\ncy4JlnQHnO2GeZhtkS4I4YOomlm1R1c2FPEHWcQh3qe0qlGHnb4pgB7dJzYVA0g+\nL7j0K+GUAGTI8Y2XsjQxRnrwD4NW0JVV1GIdFM/L/JME/mCkm8RBylQXgiKtaNz/\n9PcOs8/RAoGBAK3A4uxeN4iXiyLxcWiHu4+jmpvGREVnPSquM2jm83rXdi+RUUXD\nbMGauX6IvKsppKCBc+TNu+yQHOThxG2JVqfwQtVhF/2PjiNiUgHeNK5Z8nfQeTBa\ngUVoy66HkTseKb1NHqNA73vrxX+w2aWuDqVirkx/VRq0+MnVgPj2p0su\n-----END RSA PRIVATE KEY-----\n",
"x509Certificate": "-----BEGIN CERTIFICATE-----\nMIIDWjCCAkKgAwIBAgIVANjggqMiPuY1l3WKY5rJPQ8fZ8a7MA0GCSqGSIb3DQEB\nCwUAME0xSzBJBgNVBAsPBkFtYXpvbiBXZWIgU2VydmljZXMgTz1BbWF6b24uY29t\nIEluYy4gTD1TZWF0dGxlIFNUPVdhc2hpbmd0b24gQz1VUzAeFw0xNzA3MjcxOTE4\nMjRaFw00OTEyMzEyMzU5NTlaMB4xHDAaBgNVBAMME0FXUyBJb1QgQ2VydGlmaWNh\ndGUwggEiMA0GCSqGSIb3DQEBAQUAA4IB12AwggEKAoIBAQDMEPImZhwmrvPfPTFz\nofHSk4IXMiWNuw/4mgG/x2qEQurJHHFNv0XQ69JEozxAL7cqvs3dDm8A0qmUQXoU\nbcaYiktq9cae5Txiw57cQQz3RLqEsX5kjy+dgZm3g/RK1XuSs0NxOpir8rP/XlBk\n7X6zDiJuDiKfIqIfzZmXgFUkAeubnM++NwffslW3gDYBrFlfhm58NWLppgwjnz5W\nXEPmU2oitYDSYWaOeB4l9esSw8VP+E5cxpCc3kM+nYcUcX7w7YFPl3xBl13VLJSl\n7h675/eEsgvJBVcfIdOCW2Dee5N8Y/GwaXfkPO1d/zhTZ1nAvOyDUWmQa0e6Y77/\nwEp3AgMBAAGjYDBeMB8GA1UdIwQYMBaAFCfPxrTfVIluwBxeyYWXn1whp7N6MB0G\nA1UdDgQWBBTD56S+xCDK534VB9uZ/7TgFrAM0DAMBgNVHRMBAf8EAjAAMA4GA1Ud\nDwEB/wQEAwIHgDANBgkqhkiG9w0BAQsFAAOCAQEAdyTzX+YoIdjUCHP+c+7QWITi\nOCMJNpuT0l9NaUMzhejpLsqbSGf2YGXEM/Q2KJFXol6ISKrz9IcUVx0YiBoRjtzT\ndd+euB6qbWwFnb5HH2LBigyCCFgNEDUybqW8ya6N+FJD6fgoKdb4REimIMP+TAv6\n077NII1DxtiKCs3RscfYRJPR5m1LCJQjr4/RdcERjbpSoQaippAdXhfBWDziur+R\nTmSEaLKmlv/jJyzQ0kMmu2cBKJdly1QpA6KyzJr04RronRrPsk1GWQhrs0EkFTBw\nRZafJeYCxIHyTwtQazeqSnBzFslWW2jTmEqPHTtzUWlDPJc89yT4Xmmp2AYUWg==\n-----END CERTIFICATE-----\n"
}
Convert pem file to a single line string that can be used in the request.
awk 'NF {sub(/\r/, ""); printf "%s\\n",$0;}' file-name.pem
2. Subscription Request
URL - https://clientedge-conductor.link-labs.com/clientEdge/data/uplinkPayload/applicationToken/<ApplicationToken>/subscriptions
Request JSON -
{
"subscriptionProperties": {
"priority": 0,
"filterProperties": [
{
"name": "",
"value": ""
}
]
},
"channelRequest": {
"type": "AwsIot",
"endpoint": "test.iot.us-east-1.amazonaws.com",
"properties": [
{
"name": "awsIotTopic",
"value": "test/monitor1"
},
{
"name": "awsIotKeyId",
"value": "e45b1c12-579f-4b73-9ceb-e08723ed2564"
}
]
}}
