Demo Video
Using the Network Tester
Step 1: Setup a Symphony Link Gateway
Turn on your gateway.
Ensure you have at least one Symphony Link Gateway turned on and registered with your Conductor account. For instructions, please refer to the Symphony Link Gateway Quick Start Guide.
Place the gateway on the OPEN network.
The network tester is factory-programmed to only talk to OPEN-network gateways. If your gateway is not already on the OPEN network, you can use the Conductor web user interface to shift it to the OPEN network.
Log in to your Conductor account at conductor.link-lab.com.
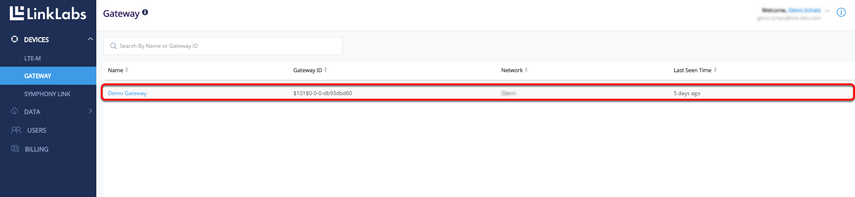
Click on the name of the gateway you want to use with the network tester from the Gateways section of your Conductor account.
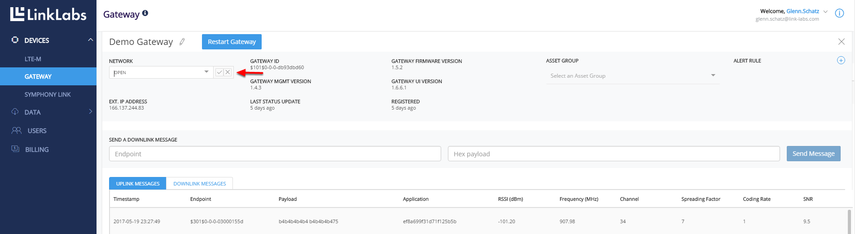
Use the NETWORK dropdown list box to select the OPEN network. Then click checkmark. The gateway is now on the OPEN network.
Step 2: Setup your Network Tester
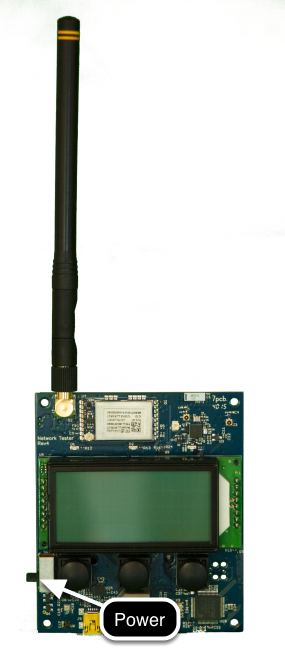
Power on the network tester.
Insert AA batteries into the network tester, fasten the antenna to the SMA jack, and then switch it on.
Wait for the network tester to connect.
The network tester will automatically connect to the nearest OPEN-network Symphony Link Gateway. It takes up to a minute to establish the first connection.
As the connection initializes, the D1 diode will flash. When the connection is made, the network tester beeps once and the diode remains on.
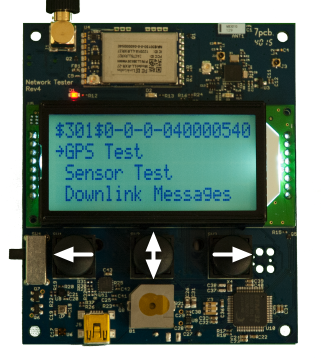
The three buttons navigate the network tester's menus. Pressing the left button takes you up one level, the middle button toggles among selections, and the right button selects the highlighted option.
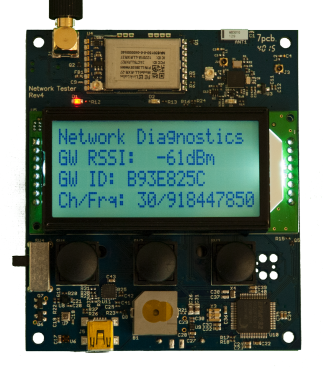
Toggle to and select Network Diagnostics to see the status of the connection, as well as information about the gateway to which the tester is connected.
Get a GPS fix.
The network tester will automatically obtain a GPS fix as long as it has an unobstructed view of the sky. It can take several minutes to obtain a new fix. When the tester has a fix, the D3 diode turns on (the right-hand diode).
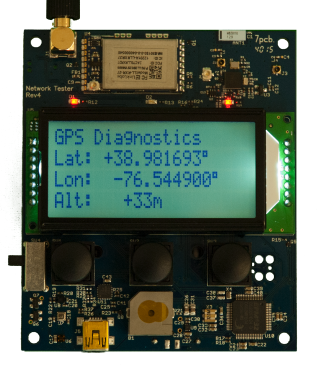
To get information about the GPS fix, toggle to and select GPS Diagnostics.
Step 3: Launch the Network Tester Webpage
Right out of the box, the network tester is ready to report data to its web-based user interface (UI). This step shows you how to access the UI.
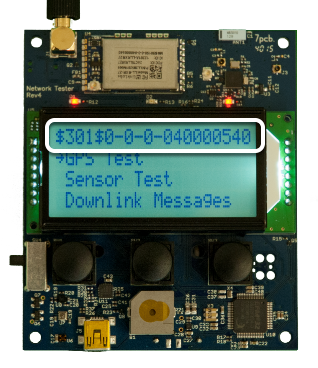
Record the UUID of your network tester.
The network tester's unique identification number (UUID) is displayed at the top of the home screen.
Navigate to the Network Tester UI
Enter the last the Network Tester's UUID after the "=" in the following URL: http://networktester.link-labs.com/linklabs/networkTester.html?module=
The Network Tester website of your unique network tester will open. We'll inspect the elements of the website as we continue testing in the next steps.

Step 4: Track Your Position
This step shows you how to use the network tester to report your GPS coordinates to the network tester webpage.
Put the tester in GPS Test mode
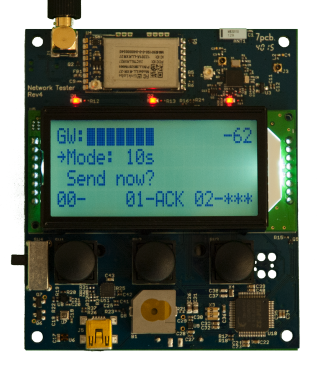
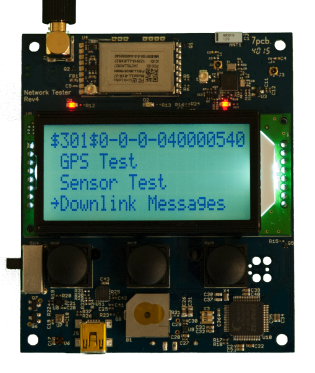
On the network tester's home screen, select GPS Test. The status bar and number at the top display the strength of the connection. The number reports the signal strength (in dBm) of the gateway's beacon, as measured by the network tester.
Toggle to and select Mode. Repeatedly selecting Mode will cycle through the available GPS reporting modes. Set the mode to 10s, so the network tester reports its GPS coordinates once every 10 seconds. The D2 diode (the middle one) lights up and the network tester beeps every time it transmits.

The banner along the bottom scrolls incrementally each time the network tester transmits. The message-number increments upward with each transmission (and rolls over at 60). After each transmission, the three asterisks associated with the current message-number will become ACK to indicate the message was successfully received by the gateway or ERR to indicate the network tester did not receive acknowledgment from the gateway.
For example, in the picture below, GPS message 01 was acknowledged by the gateway and the network tester is transmitting message 02.
Take a walk.
Take the network tester for a walk. While you walk, watch the connection strength to get an idea of the range you're getting from the gateway. The network tester will probably remain connected down to a signal strength of about -120 dBm.
If your network tester happens to lose its connection, it will beep and the D1 diode will go out. Walk back toward the gateway. The network tester will automatically reconnect when the signal becomes strong enough.
Look at your journey.
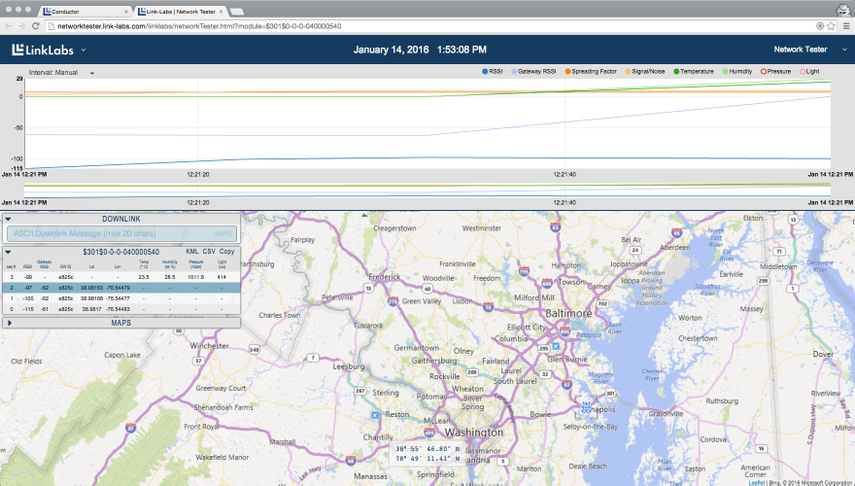
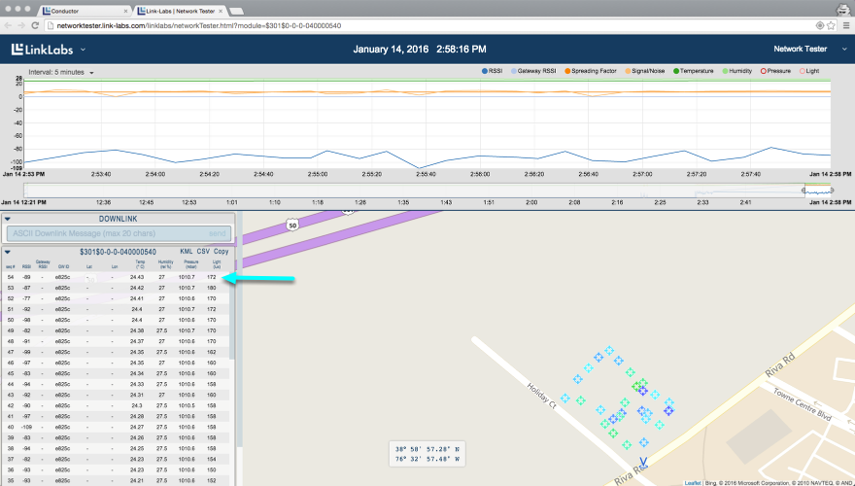
When you have finished walking around, take a look at the network tester webpage. The GPS coordinates of each transmission are recorded on the map in the main window, color coded to represent the connection strength. They show the path you just walked.
The list box on the left-hand side of the page shows the details of each successful uplink. You can download these data, either as *kml or *csv, by clicking on the word KML or CSV.
Step 5: Uplink Sensor Data
In addition to having onboard GPS, the network tester includes a temperature sensor, a humidity sensor and a pressure sensor. This step shows you how to send these data to the network tester webpage.
Place the Network Tester in Sensor Test mode.
On the network tester's home screen, select Sensor Test. Then toggle the Mode to 10s. In this mode, the network tester sends the sensor data once every 10 seconds, similar to GPS Test mode.

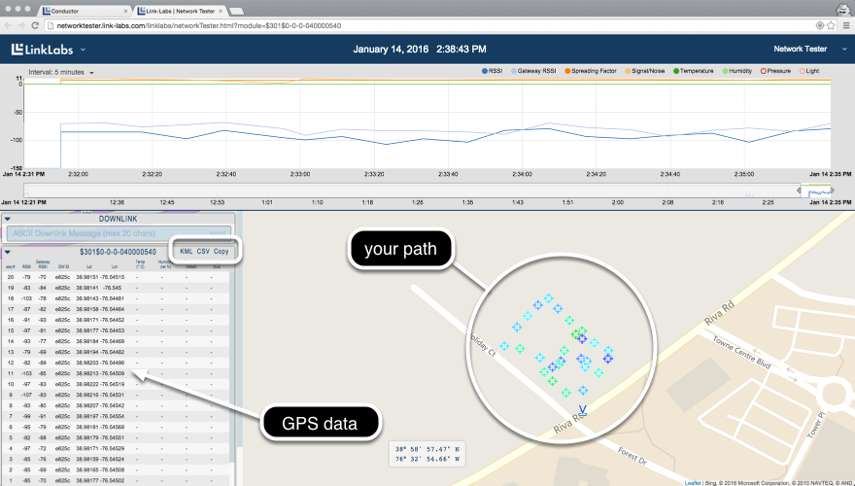
Look at the data.
The sensor data is displayed in the left-hand list box on the network tester webpage. The most recent data are displayed at the top.
Step 6: Send Yourself a Downlink Message
Place the network tester in Downlink Message mode.
From the network tester's home screen, select Downlink Messages.
Send a message from the network tester webpage.
Enter a message into the DOWNLINK edit box on the network tester webpage and click send.
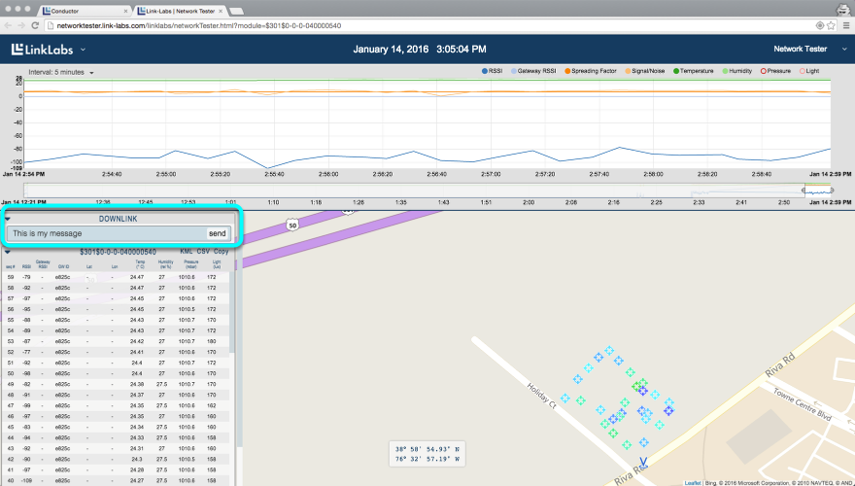
Read the message.
The downlink message posts to the network tester's Downlink Messages screen.