Overview
Prelude is a program for controlling the LL-RLP-20 and/or LL-RXR-27 USB-UART evaluation boards. The program allows users quickly to start sending and receiving messages using the Symphony Link system. The software offers a graphical representation of the behavior of Link Labs' family of Symphony Link Modules as connections are established and messages are sent and received.
Prelude can control the LL-RLP-20/RXR-27 using Symphony Link mode or NoMac mode. In Symphony Link mode, the module is configured to participate in a Symphony Link network, and communicates using the automatic functionality of the Symphony Link media-access control (MAC) protocol. In contrast, NoMac mode offers direct access to the module's low-level radio parameters.
Getting Started
Install Prelude
Download the latest version of the Prelude Windows Installer.
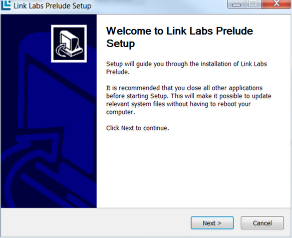
Launch the installer executable and click Next on the welcome screen.
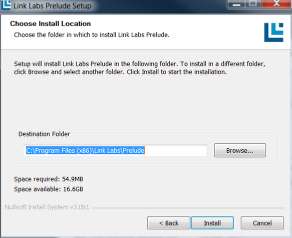
Choose an installation location and click Install to start the installation.
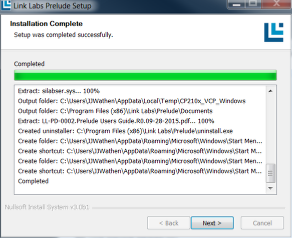
Click Next to finish the installation of Prelude.
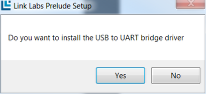
The installer prompts you to install drivers for the evaluation board's USB-to-UART bridge. These drivers allow your PC to recognize the evaluation board as a USB device. If you haven't already installed the drivers, click Yes and follow the on-screen instructions to install them.
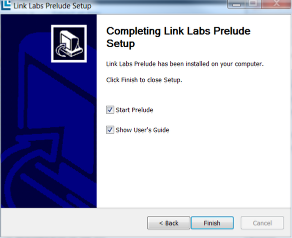
Complete the Prelude installation by clicking Finish on the Prelude setup window.
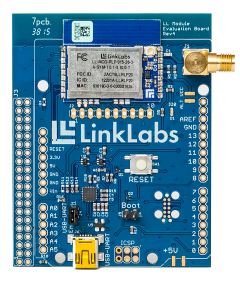
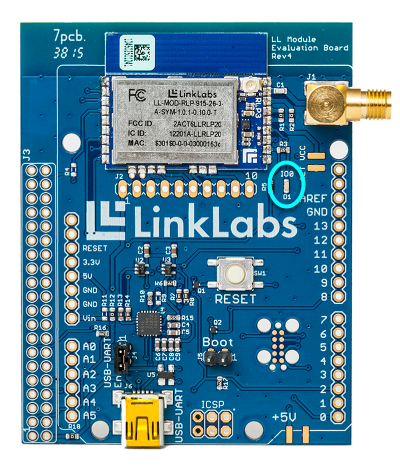
Hardware Setup
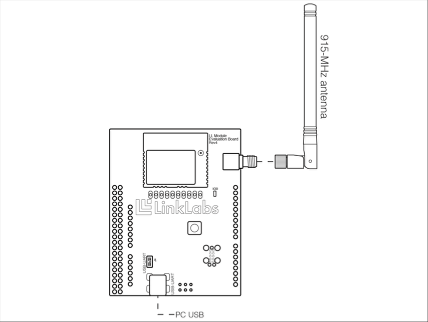
This article walks you through hardware setup of an LL-RLP-20/RXR-27 evaluation board.
Attach the 915-MHz antenna to the evaluation board's SMA jack.
If you have not yet done so, install Prelude. Be sure to install the drivers for the evaluation board's USB-to-UART bridge when prompted.
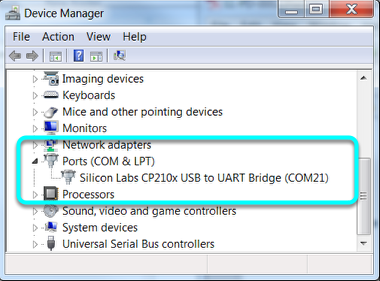
Connect the evaluation board to a PC using a mini-USB cable. A new virtual serial port called Silicon Labs CP210x USB to UART Bridge will enumerate to the Ports (COM & LPT) section of the Windows Device Manager.
Once connected to the PC, the evaluation board's IO0 light-emitting diode illuminates, indicating the module has been RESET.
Symphony Link Mode
This article describes how to use Prelude with the evaluation board's module operating in Symphony Link mode.
The first connection
The first time a factory-fresh evaluation-board module is powered up, it defaults to Symphony Link mode, and it begins by listening for Symphony Link gateways that advertise the OPEN Network Token. The firmware embedded in the module controls this process, and it happens regardless whether the evaluation board is attached to Prelude. After the module scans the entire available spectrum, usually 902 to 928 MHz in the US, it connects to the "loudest" available OPEN-network gateway. This process takes between 30 to 60 seconds.
To start controlling the module in Symphony Link mode via Prelude, first setup a Symphony Link gateway, and then Launch Prelude.
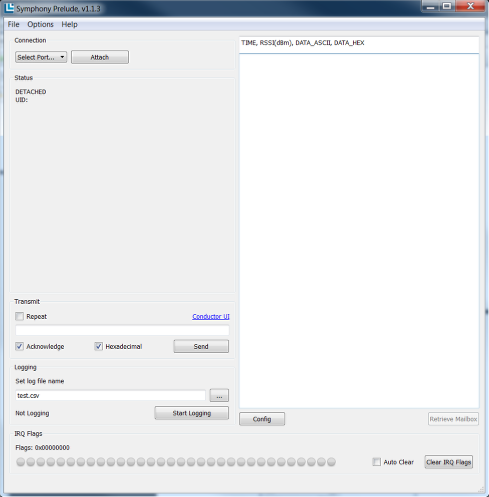
From Prelude's Connection drop-down menu, select the serial port associated with the evaluation board. In this example, it is COM21. Click Attach.

You will see Prelude's Status group box begin to update, displaying the status of the evaluation board's module.
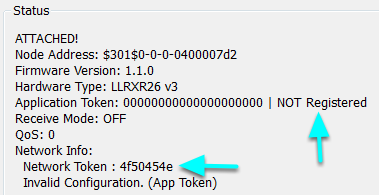
Notice that the Application Token displays as NOT Registered, because the factory fresh module has not yet been associated with a valid Application Token. This module is not yet ready to communicate with a Conductor account.
Also notice that the Network Token displays 4f50454e, which is the hex representation of ASCII "Open." By default, factory-fresh modules advertise the OPEN Network Token. For the module to connect to a Symphony Link gateway, both the module and the gateway must advertise the same Network Token.
Prelude's IRQ Flags section shows that the module has latched several IRQ Flags. Hover over the red dots to investigate which IRQ flags have been set. In the picture below, the four red dots correspond to:
- IRQ_FLAGS_RESET -- the module experienced a RESET event when it was powered on by connecting to the computer via USB.
- IRQ_FLAGS_CRYPTO_ESTABLISHED -- the module successfully exchange crypto keys with an in-range Symphony Link gateway.
- IRQ_FLAGS_CONNECTED -- the module connected to the in-range Symphony Link gateway
- IRQ_FLAGS_APP_TOKEN_ERROR -- the module is not yet registered with a valid Application Token.
You may optionally clear the IRQ flags by clicking the Clear IRQ Flags button. Doing so will extinguish the IO0 LED on the evaluation board.
Setting the Network Token
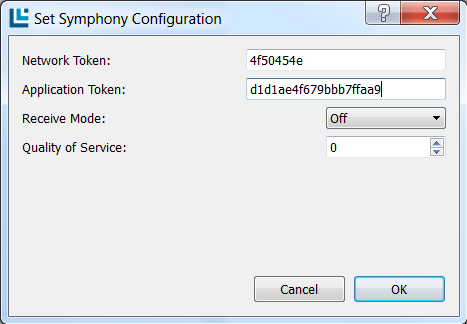
From Prelude's Options menu, select Set Symphony Config. Enter the desired Network Token and click OK. Keep in mind that both the module and the gateway must advertise the same Network Token to communicate with one another. For the example pictures that follow, we'll leave the module on the OPEN network with Network Token 4f50454e (which is hex for ASCII "OPEN").

If a new Network Token has been assigned, the module begins searching for a matching gateway. If there is no gateway advertising the same Network Token, the module will set the IRQ_FLAGS_DISCONNECTED flag. If the module does find a matching gateway, it will set IRQ_FLAGS_CONNECTED. One of these states will occur within about 60 seconds.
The Network Token assigned to a module persists in its flash memory.
Setting the Application Token
From Prelude's Options menu, select Set Symphony Config. Enter a valid Application Token from your Conductor account and click OK.
Please refer to the Symphony Link Development Kit Quick Start Guide for instructions to generate a new Application Token. (In this case, we'll set an Application Token from a demonstration Conductor account.)
The module registers with the Conductor account using the provided Application Token. Prelude's Status panel updates as the registration proceeds.
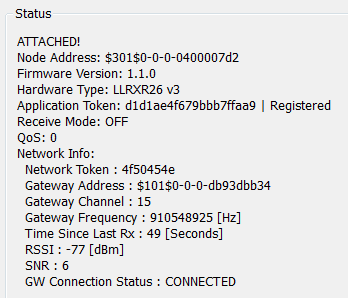
The module has now successfully connected to an OPEN-network gateway and has registered with a valid Application Token. It is ready to communicate with your Conductor account via a Symphony Link network.
Notice that the module set two new IRQ flags as the Application Token was registered:
- IRQ_FLAGS_APP_TOKEN_CONFIRMED -- the module registered with a valid Application Token.
- IRQ_FLAGS_DOWNLINK_REQUEST_ACK -- the module notified Conductor of its current Receive Mode (in this case, the receive mode is OFF).

Once the module is assigned an Application Token, the token will persist in the module's flash memory.
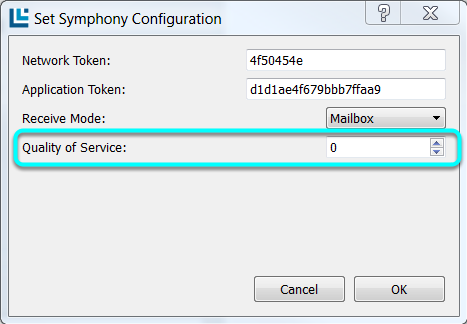
Toggling the Receive Mode
The module operates in one of three receive modes: Off, Always On or Mailbox. To toggle among the modes, select Options > Set Symphony Config. Then select the desired receive mode and click OK.
The module will notify the connected gateway of its new receive mode.
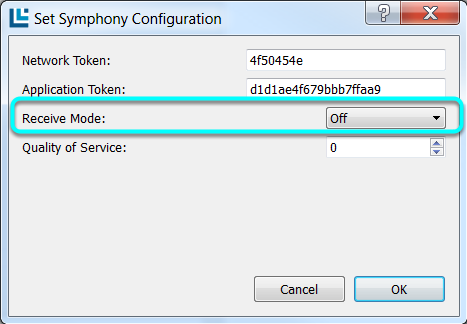
Receive Mode Off
In this mode, the module's receiver is off and the module is not ready to receive a downlink communication from Conductor.
Receive Mode Always On
In this mode, the module's receiver runs continuously and the module is always ready to receive new downlink traffic from Conductor.
Receive Mode Mailbox
In this mode, downlink messages are cached at the gateway. The module must request to receive cached messages from the gateway. In this case, the module's receiver is only energized during the interval required to receive all cached downlink messages. This mode is particularly useful for energy-conscious applications that require downlink.
When Mailbox receive mode is selected, Prelude's Retrieve Mailbox button becomes active. Click on the Retrieve Mailbox button to receive any downlink messages cached by the connected gateway.

Setting the Quality of Service (QoS)
To set the module's Quality of Service (QoS), select Options > Set Symphony Config. Enter the desired Quality of Service and click OK. A valid QoS setting is any integer between 0 and 15, inclusive, with 15 being the highest QoS.
Select the RF path
The LL-RLP-20 or LL-RXR-27 may be configured for one of two RF paths: (1) through the module's trace antenna; or (2) through the module's on-board coax connector and RF pin. A factory-fresh module defaults to the latter, which directs the RF path to the evaluation board's SMA connector.
To toggle the RF path, select Set RF Path and then select the desired RF path.
Sending uplink messages
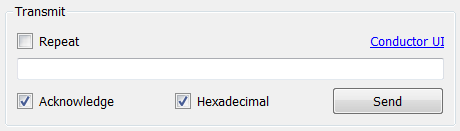
Uplink messages are sent using Prelude's Transmit group box. By default, Prelude is configured to transmit messages that are strings of hexadecimal bytes. If desired, plain ASCII-string messages may be sent by de-selecting the Hexadecimal check box. The maximum message-length supported by Symphony Link is 256 bytes.
Also by default, Prelude transmits "acknowledged" uplink messages, meaning the gateway confirms receipt of the uplink message. An "unacknowledged" message can optionally be sent by de-selecting the Acknowledge check box. In this case, the gateway will not confirm receipt of the uplink message and the module will be ready to transmit another message as soon as its transmit queue is empty.
You may optionally configure Prelude to continuously send the same message repeatedly by selecting the Repeat check box.
To send a message, enter the message into the Uplink Message edit box and click Send.
When the Send command is issued, the module will wake up and attempt to reconnect with the gateway with which it was last connected. If the expected gateway is not found, the module will set the IRQ_FLAGS_DISCONNECTED flag, and commence scanning for any available gateways. If the module finds and connects to a new gateway, it will transmit the uplink message. If the module cannot connect to a new gateway, it will set the IRQ_FLAGS_TX_ERROR once the gateway scan is complete.
Acknowledged uplink messages
Prelude triggers an acknowledged transmission when the Acknowledge check box is selected and the Send button is clicked. Once the module receives the message content from Prelude, it attempts to synchronize to the last known gateway. If successful, the module transmits the message and waits for an acknowledgment from the gateway. After the module receives acknowledgment, it sets the IRQ_FLAGS_TX_DONE flag.
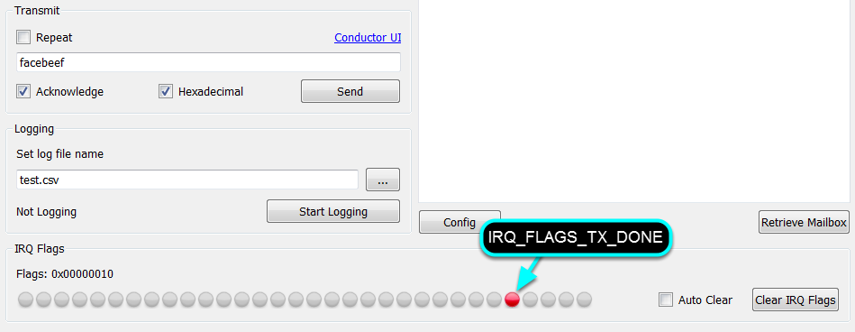
If the module does not receive an acknowledgment, it sends the message again up to two more times. After three unsuccessful attempts, the module sets the IRQ_FLAGS_TX_ERROR flag to notify the external host of the send failure.
Unacknowledged uplink messages
Prelude triggers an unacknowledged transmission when the Acknowledge check box is not checked and the Send button is clicked. In this case, the module does not listen for acknowledgment after the message is sent. The module sets the IRQ_FLAGS_TX_DONE after the entire message is sent.
Repeat
When the Repeat check box is selected and the Send button is clicked, Prelude behaves as described earlier, but with the exception that it will append a single-byte counter to the uplink message. After the module reports either TX_FLAGS_TX_DONE or IRQ_FLAGS_TX_ERROR, Prelude checks whether the Repeat check box is selected. If it is, Prelude increments the counter and triggers another transmission.
Sending a message with the Repeat check box selected automatically causes the Auto Clear check box to become selected. With Auto Clear selected, Prelude periodically clears all IRQ flags.
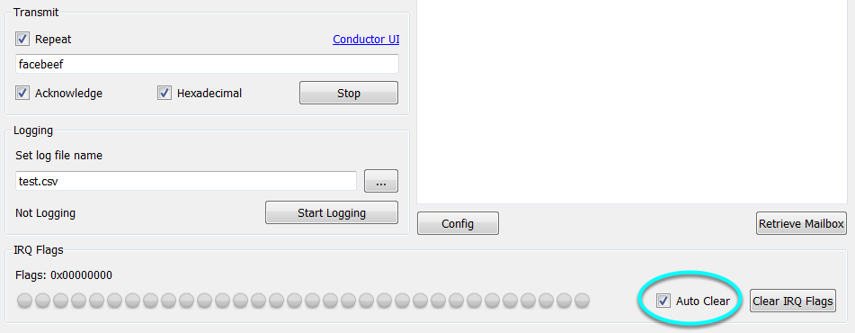
To stop the repeated transmissions, click Stop.
Viewing uplink messages on Conductor
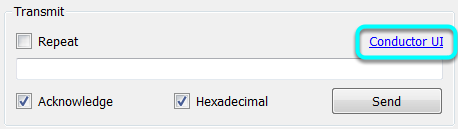
Uplink messages are sent to the associated Application within your Conductor account. Prelude provides a Conductor UI hyperlink. Clicking on this link opens a web browser directed to the Conductor UI login.
For a quick tutorial to learn how to access your Conductor account and view uplink messages, please refer to the Symphony Link Development Kit Quick Start Guide.
Receiving downlink messages
Downlink messages are triggered from Conductor and addressed to a particular module by referencing the module's universally unique identification number (UUID). To set the module to receive downlink messages, you must first set the Receive Mode to either Always On or Mailbox.
Downlink messages can be sent manually from your account using the Conductor UI, or programmatically using the Conductor APIs.
- For a quick tutorial to learn to send downlink messages manually from your Conductor account, please refer to the Symphony Link Development Kit Quick Start Guide.
- Link Labs provides a Python wrapper of the Conductor API as well as a command-line utility to post a command programmatically from Conductor to a module.
When Conductor triggers a downlink message, it routes the message to the gateway that is connected to the specified module. The gateway then transmits the message over the air to the module.
- If the Receive Mode of the module is set to Off, it will not receive the message. Conductor will notify you that the downlink operation failed if acknowledgment was requested with the send command.
- If the Receive Mode is set to Always On and the module receives the message, the module sets the IRQ_FLAGS_RX_DONE flag. Prelude then retrieves the message from the module and displays the message in the large Receive Window list box. If acknowledgment was requested with the send command, the module will transmit acknowledgment of receipt in the next frame.
- If the Receive Mode is set to Mailbox, the gateway will cache all downlink messages until the module notifies the gateway it is ready to receive. To retrieve Mailbox messages using Prelude, click the Retrieve Mailbox button located below the Receive Window. Again, if acknowledgment was requested with any pending downlink operations, the module will transmit acknowledgment following receipt.
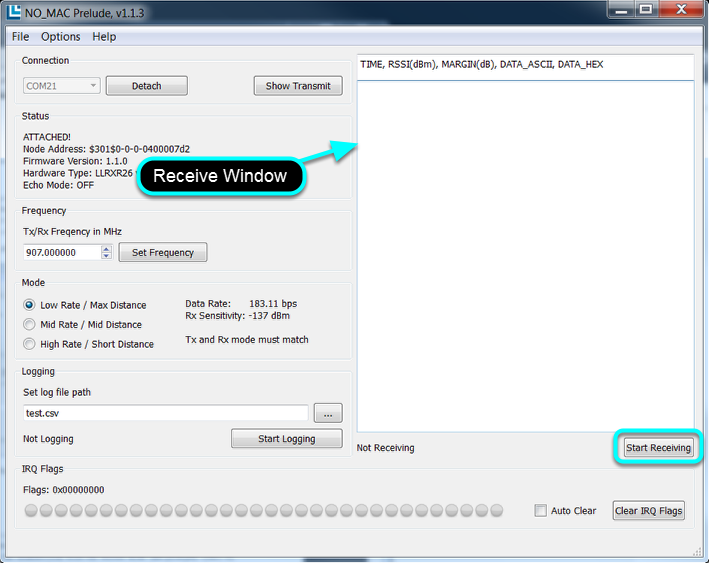
Logging downlink messages
Prelude can optionally log all downlink traffic to a comma-separated-value (CSV) file. This file includes the message payload, the time-stamp, and the received signal strength associated with each message. The message payloads are logged as both plain ASCII and hexadecimal bytes.
To start logging downlink traffic, specify the desired file name in the Set log file name edit box and then click the Start Logging toggle button.
Shifting to NoMac mode
Prelude can optionally control the evaluation board's module in NoMac mode. To shift to NoMac mode, select Options > NoMac Mode. The Symphony Prelude form will close, and a new NO_MAC Prelude form will open.
Please refer to the NoMac Mode article for more information on using Prelude in NoMac mode.
NoMac Mode
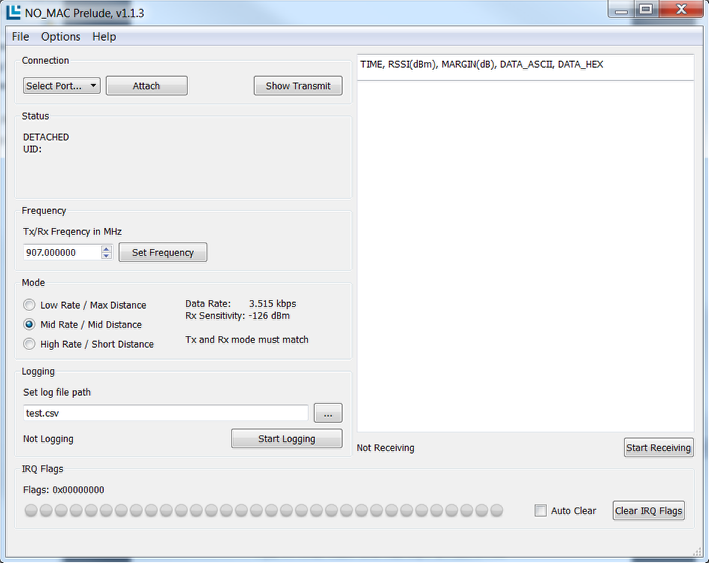
NoMac mode bypasses the Symphony Link MAC protocol and gives users the ability to evaluate the performance of the LoRa modulation format and the Semtech LoRa radio used by the LL-RLP-20 and LL-RXR-27. After shifting to NoMac mode from Symphony Link mode, the NO_MAC Prelude form opens.
Radio parameters
Set the desired radio parameters by checking the appropriate radio button from Prelude's Mode panel. The radio parameters of each selection are defined below.

Transmit power
In NoMac mode, the transmit power is always set to the highest power available from the module.
Time on Air
The LoRa physical layer allows many combinations of low-level parameters like the spreading factor (SF), bandwidth and coding rate (CR). These parameters affect the data rate, sensitivity, and time on air. In NoMac mode, Prelude limits selection or radio parameters to the three options listed in the table below. Each selection represents a trade-off between data rate and link margin.
|
Radio parameter set |
SF |
Bandwidth (kHz) |
CR |
|
low rate / max distance |
12 |
125 |
1/2 |
|
mid rate / mid distance |
9 |
250 |
4/5 |
|
max rate / short distance |
7 |
500 |
4/5 |
Frequency
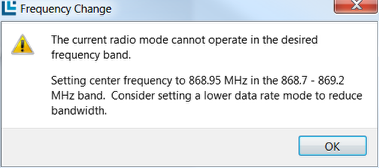
Prelude allows several operating frequency bands: 868.5 - 868.6 MHz; 868.7 - 869.2 MHz; 869.4 - 869.65 MHz; 869.7 - 870 MHz; and 902 - 928 MHz. The entire LoRa transmission must fit within any one of the listed frequency bands.
Clicking the Set Frequency button sets the center frequency of the LoRa transmission. If the selected radio parameters are incompatible with the selected frequency, Prelude will issue a warning similar to the following:
Transmitting
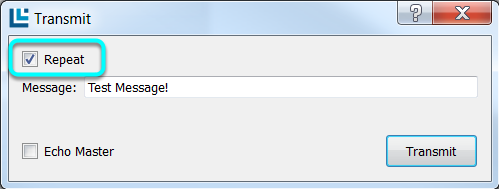
To open the Transmit Window, click the Show Transmit button.
The Transmit Window appears. To transmit a message, enter the text payload in the Message edit box and click the Transmit button.
The evaluation board's module will transmit the message using the selected radio parameters. After the transmission is complete, the module sets the IRQ_FLAGS_TX_DONE flag. Prelude automatically clears all IRQ flags each time the Transmit button is clicked so that new IRQ events may be observed.

Repeat
Prelude will repeatedly transmit the same message if the Repeat check box is selected. Prelude will send the message, wait one second, and then attempt to transmit again. If the module is still transmitting the previous message, Prelude will wait another second and then attempt to transmit again. This process repeats until either the Stop button is clicked or the Repeat check box is de-selected.
Receiving
Click the Start Receiving button to begin receiving messages sent from other NoMac-mode modules. Prelude will write the selected radio parameters to the module before it sets the module to receive. Upon receipt of a message, the module sets the IRQ_FLAGS_RX_DONE flag. Prelude then retrieves the message from the module and displays the message in the Receive Window.
The module is able to receive any LoRa transmissions with matching radio parameters.
Echo mode
A module using NoMac provides a special operating mode called Echo mode. In Echo mode assigns a module to be either a master or slave node. The master node initiates an echo transaction by transmitting a LoRa message. The slave node receives the transmission from the master and then promptly echos by transmitting the same message. The master node then attempts to receive the echo from the slave node.
To use Echo mode, attach an evaluation board to Prelude and select Options > Set Remote Echo Mode. This configures the attached module to be a slave node.
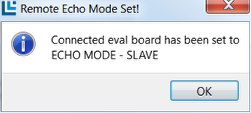
After the slave node is configured, detach it from Prelude and then attach the intended master node. Ensure the master node is using the same radio parameters as the slave node and then open the Transmit window and select the Echo Master check box.
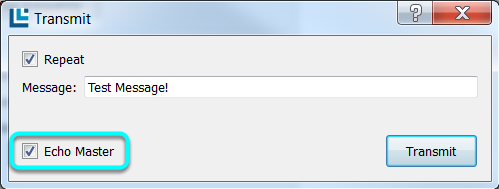
Enter the desired message in the Message edit box and click Transmit.
Select the RF path
Setting the RF path is done in the same way for NoMac and Symphony Link modes.
Switching to Symphony Link mode
To switch Prelude to control the module using Symphony Link mode, select Options > Symphony Link. The NO_MAC Prelude form will close and a new Symphony Prelude form will open.
Logging
While in NoMac mode, Prelude's logging functionality is identical to that in Symphony Link mode.
IRQ Flags
The LL-RLP-20 and LL-RXR-27 are designed to be controlled by an external host microcontroler. The module-firmware provides a host interface, over which the host initiates communication with the module. If, on the other hand, the module needs to initiate communication with the host, it does so by raising IRQ (interrupt request) flags. The host detects IRQ flags by polling the module, and can then take appropriate action to respond.
Prelude provides a real-time graphical representation of which IRQ flags have been set by the evaluation board's module. This is useful to observe and understand the behavior of the module's firmware.
NoMac mode uses only a subset of the IRQ flags available to Symphony Link mode. The following table lists all IRQ flags and whether they are used by Symphony Link and/or NoMac mode. Please refer to documentation of the modules for further information regarding IRQ flags.
|
IRQ Flag |
Symphony Link |
NoMac |
|
IRQ_FLAGS_WDOG_RESET |
X |
X |
|
IRQ_FLAGS_RESET |
X |
X |
|
IRQ_FLAGS_TX_QUEUE_EMPTY |
X |
X |
|
IRQ_FLAGS_TX_ERROR |
X |
X |
|
IRQ_FLAGS_RX_DONE |
X |
X |
|
IRQ_FLAGS_CONNECTED |
X |
|
|
IRQ_FLAGS_DISCONNECTED |
X |
|
|
IRQ_FLAGS_CRYPTO_ESTABLISHED |
X |
|
|
IRQ_FLAGS_APP_TOKEN_CONFIRMED |
X |
|
|
IRQ_FLAGS_CRYPTO_ERROR |
X |
|
|
IRQ_FLAGS_APP_TOKEN_ERROR |
X |
|
Firmware Updates with Prelude
Prelude offers an easy method to update the firmware of an evaluation board's module. Additionally, the latest release of Prelude is packaged with the latest release of module firmware, and Prelude will automatically prompt you to update the firmware of an out-of-date module when it is attached. Prelude uses the module's installed bootloader to load an encrypted binary image of the firmware update.
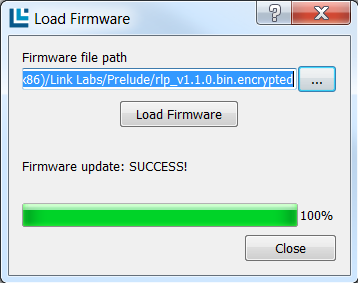
To load new firmware to the evaluation board's module, attach the module to Prelude and select Help > Load Firmware. The Load Firmware window will open.
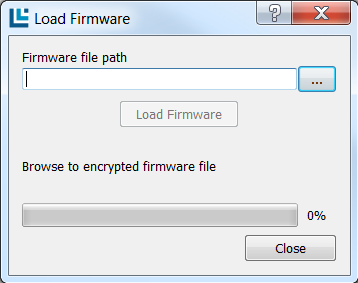
Navigate to the path of the target encrypted binary and select the correct file. Then click Load Firmware.
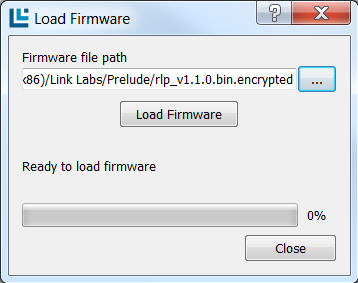
The Load Firmware window indicates progress as the new firmware is flashed to the module.
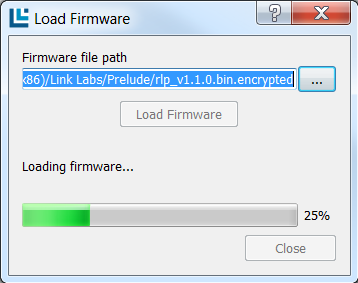
When the firmware update is complete, the Load Firmware window indicates success. You can close the window.
Minimum firmware version
Prelude requires a minimum module firmware version to operate properly. If the attached module reports a firmware version older than the required minimum version, Prelude displays the following notification when the module is attached to Prelude.
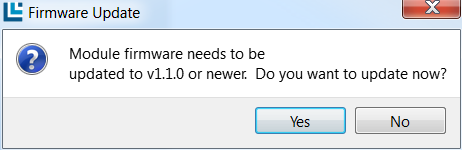
Click Yes, and Prelude will automatically load the latest firmware release to the module.